go第三方库 github.com/spf13/viper 实现了对配置文件的读取并注入到结构中,好用方便。
其中以
viperInstance := viper.New()	// viper实例
viperInstance.WatchConfig()
viperInstance.OnConfigChange(func(e fsnotify.Event) {
	log.Print("Config file updated.")
	viperLoadConf(viperInstance)  // 加载配置的方法
})
可实现配置的热更新,不用重启项目新配置即可生效(实现热加载的方法也不止这一种,比如以文件的上次修改时间来判断等)。
为什么这么写?这样写为什么就能立即生效?基于这两个问题一起来看看viper是怎样实现热更新的。
上面代码的核心一共两处:WatchConfig()方法、OnConfigChange()方法。WatchConfig()方法用来开启事件监听,确定用户操作文件后该文件是否可正常读取,并将内容注入到viper实例的config字段,先来看看WatchConfig()方法:
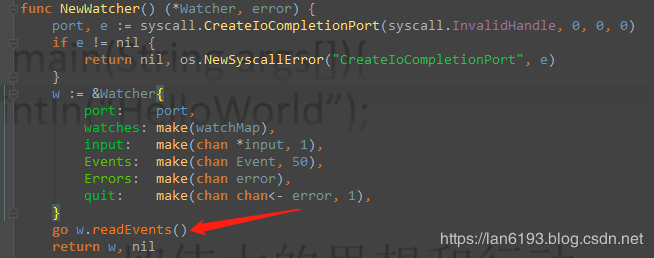
func (v *Viper) WatchConfig() {
	go func() {
      // 建立新的监视处理程序,开启一个协程开始等待事件
      // 从I/O完成端口读取,将事件注入到Event对象中:Watcher.Events
		watcher, err := fsnotify.NewWatcher()
		if err != nil {
			log.Fatal(err)
		}
		defer watcher.Close()

		// we have to watch the entire directory to pick up renames/atomic saves in a cross-platform way
		filename, err := v.getConfigFile()
		if err != nil {
			log.Println("error:", err)
			return
		}

		configFile := filepath.Clean(filename)    //配置文件E:\etc\bizsvc\config.yml
		configDir, _ := filepath.Split(configFile)  // E:\etc\bizsvc\


		done := make(chan bool)
		go func() {
			for {
				select {
        // 读取的event对象有两个属性,Name为E:\etc\bizsvc\config.yml,Op为write(对文件的操作)
				case event := -watcher.Events:
		// 清除内部的..和他前面的元素,清除当前路径.,用来判断操作的文件是否是configFile
					if filepath.Clean(event.Name) == configFile {
        // 如果对该文件进行了创建操作或写操作
						if event.Opfsnotify.Write == fsnotify.Write || event.Opfsnotify.Create == fsnotify.Create {
							err := v.ReadInConfig()
							if err != nil {
								log.Println("error:", err)
							}
							v.onConfigChange(event)
						}
					}
				case err := -watcher.Errors:
         // 有错误将打印
					log.Println("error:", err)
				}
			}
		}()

		watcher.Add(configDir)
		-done
	}()
}
其中,fsnotify是用来监控目录及文件的第三方库; watcher, err := fsnotify.NewWatcher() 用来建立新的监视处理程序,它会开启一个协程开始等待读取事件,完成 从I / O完成端口读取任务,将事件注入到Event对象中,即Watcher.Events;
执行v.ReadInConfig()后配置文件的内容将重新读取到viper实例中,如下图:
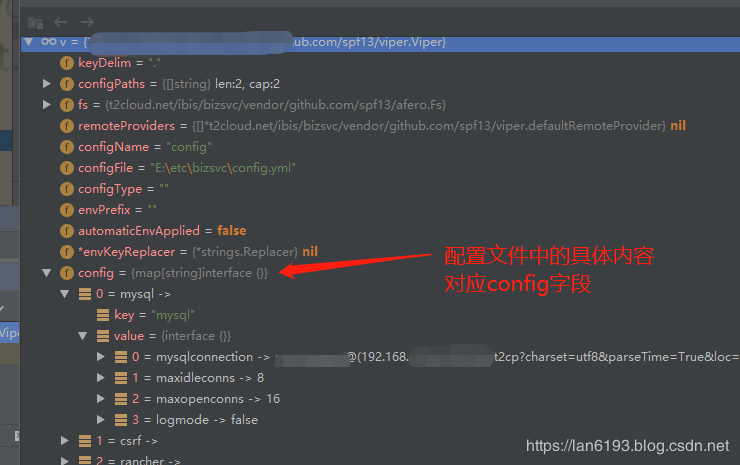
执行完v.ReadInConfig()后,config字段的内容已经是用户修改的最新内容了;
其中这行v.onConfigChange(event)的onConfigChange是核心结构体Viper的一个属性,类型是func:
type Viper struct {
	// Delimiter that separates a list of keys
	// used to access a nested value in one go
	keyDelim string

	// A set of paths to look for the config file in
	configPaths []string

	// The filesystem to read config from.
	fs afero.Fs

	// A set of remote providers to search for the configuration
	remoteProviders []*defaultRemoteProvider

	// Name of file to look for inside the path
	configName string
	configFile string
	configType string
	envPrefix string

	automaticEnvApplied bool
	envKeyReplacer   *strings.Replacer

	config     map[string]interface{}
	override    map[string]interface{}
	defaults    map[string]interface{}
	kvstore    map[string]interface{}
	pflags     map[string]FlagValue
	env      map[string]string
	aliases    map[string]string
	typeByDefValue bool

	// Store read properties on the object so that we can write back in order with comments.
	// This will only be used if the configuration read is a properties file.
	properties *properties.Properties

	onConfigChange func(fsnotify.Event)
}
它用来传入本次event来执行你写的函数。为什么修改会立即生效?相信第二个疑问已经得到解决了。
接下来看看OnConfigChange(func(e fsnotify.Event) {...... })的运行情况:
func (v *Viper) OnConfigChange(run func(in fsnotify.Event)) {
	v.onConfigChange = run
}
方法参数为一个函数,类型为func(in fsnotify.Event)) {},这就意味着开发者需要把你自己的执行逻辑放到这个func里面,在监听到event时就会执行你写的函数,所以就可以这样写:
	viperInstance.OnConfigChange(func(e fsnotify.Event) {
		log.Print("Config file updated.")
		viperLoadConf(viperInstance)  // viperLoadConf函数就是将最新配置注入到自定义结构体对象的逻辑
	})
而OnConfigChange方法的参数会赋值给形参run并传到viper实例的onConfigChange属性,以WatchConfig()方法中的v.onConfigChange(event)来执行这个函数。
到此,第一个疑问也就解决了。
到此这篇关于详解go基于viper实现配置文件热更新及其源码分析的文章就介绍到这了,更多相关go viper文件热更新内容请搜索脚本之家以前的文章或继续浏览下面的相关文章希望大家以后多多支持脚本之家!
您可能感兴趣的文章:- golang使用信号量热更新的实现示例
- 解读golang plugin热更新尝试


 咨 询 客 服