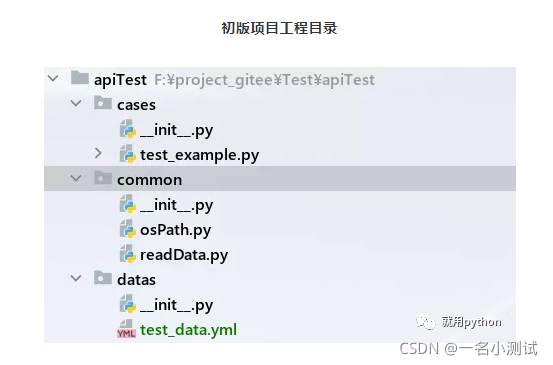
目录
- common中存放的是整个项目中公共使用的封装方法
- 数据分离的第一步先找到工程项目路径
- 数据分离的第二步封装一个读取yml文件的函数或类方法
- 数据分离的第三步测试用例中引入数据并运行

common中存放的是整个项目中公共使用的封装方法
从工程目录上可以看到区分
datas中专门存放测试数据(yml文件)
cases中专门集中存放测试用例 ...
数据分离的第一步先找到工程项目路径
# -*- encoding: utf-8 -*-
"""
@__Software__: PyCharm
@__File__: osPath.py
@__Date__: 2021/6/14 21:08
"""
import os
# 获取项目的根目录,apiTest层
FILE = os.path.abspath(os.path.dirname(os.path.dirname(__file__)))
# 获取存放测试数据的文件夹
DATAS = os.path.join(FILE, 'datas')
print(DATAS)
 F:\project_gitee\Test\apiTest\datas
Process finished with exit code 0
运行结果可以清晰看到,已经找到存放数据的文件夹路径并拼接成功 ...
os模块不熟悉可参考菜鸟教程
数据分离的第二步封装一个读取yml文件的函数或类方法
这里就先写一个函数把
首先要先安装yml
再导入包,然后再进行封装
# -*- encoding: utf-8 -*-
"""
@__Software__: PyCharm
@__File__: readData.py
@__Date__: 2021/6/14 21:07
"""
import os
import yaml
from common import osPath as sp
def read_yml(file):
    with open(file, mode='r', encoding='utf-8') as read_data:
        results = yaml.load(read_data, Loader=yaml.FullLoader)
        return results
print(read_yml(os.path.join(sp.DATAS, 'test_data.yml')))
{'test_data': [[{'type': 1}, {'reason': '查询成功!'}], [{'type': 2}, {'reason': '查询成功!'}], [{'type': 3}, {'reason': '查询成功!'}]]}
Process finished with exit code 0
读取yml的函数写完以后,要记得测试下是否满足自己需要的功能;从结果来看满足我目前需要功能 ...
yaml语法不熟悉的也可以参考菜鸟教程
数据分离的第三步测试用例中引入数据并运行
# -*- encoding: utf-8 -*-
"""
@__Software__: PyCharm
@__File__: test_example.py
@__Date__: 2021/6/13 19:00
"""
import os
import pytest
import requests
from common import osPath as sp
from common.readData import read_yml
class TestExample:
    s = requests.Session()
    data = read_yml(os.path.join(sp.DATAS, 'test_data.yml'))
    @pytest.mark.parametrize("test_data, expected", data['test_data'])
    def test_example(self, test_data, expected):
        with self.s as s:
            url = "http://apis.juhe.cn/fapig/euro2020/schedule?key=9d0dfd9dbaf51de283ee8a88e58e218b"
            response = s.get(url, params=test_data)
            print(response.json())
             assert response.json()["reason"] == expected["reason"]
if __name__ == '__main__':
    pytest.main(["-v", "-s", "test_example"])
Launching pytest with arguments F:/project_gitee/Test/apiTest/cases/test_example.py in F:\project_gitee\Test\apiTest\cases
============================= test session starts ============================
collecting ... collected 3 items
test_example.py::TestExample::test_example[test_data0-expected0]
test_example.py::TestExample::test_example[test_data1-expected1]
test_example.py::TestExample::test_example[test_data2-expected2]
 ============================== 3 passed in 0.66s ==============================
data['test_data']是字典取值,取key为test_data的value值 ...
从返回的结果可以清晰看到,3 passed,且用时0.66s ...
至此,测试数据和代码分离完成 ...
以上就是python接口自动化测试数据和代码分离解析的详细内容,更多关于python接口自动化测试资料请关注脚本之家其它相关文章!
您可能感兴趣的文章:- Python接口自动化浅析数据驱动原理
- Python接口自动化浅析登录接口测试实战
- Python接口自动化浅析unittest单元测试原理
- python使用pytest接口自动化测试的使用
- Python实现http接口自动化测试的示例代码
 咨 询 客 服