vscode简介
什么是vscode
简单来说,vscode是一款文本编辑器,而不是ide。这就是说,vscode只提供编辑的环境而不提供编译的环境,如果想要用vscode来集成开发环境,则必须经过以下几步:
- 安装必须的编译器(比如mingw,python,texlive等)
- 配置相应编译环境(添加环境变量等)
- 安装匹配的vscode的拓展插件
- 通过拓展插件提供的“属性”将外部编译器链接到vscode
同时,一个文本编辑器肯定不会提供运行程序的功能,vscode也是如此。要运行程序,有如下几种方法:
- vscode的一些拓展插件中会提供配置好的终端和运行程序的命令,我们可以直接使用;
- vscode中有专门运行程序的拓展插件code-runner,可以安装后使用;
- vscode提供了对数种终端的接口,我们可以在vscode中像使用cmd小黑框那样使用终端,由此我们可以在vscode终端中运行程序;
这样,我们大致了解了使用vscode编译、运行程序的方法。
vscode的配置
首先,我们要明确vscode的配置的最小单元是文件夹,即可以使用打开文件夹功能我们可以把不同的文件夹链接到不同的外部编译器、实现不同的快捷任务、快速进行debug和详细设定拓展插件的功能等等。
因此,我们先速览vscode的配置结构,如下图:
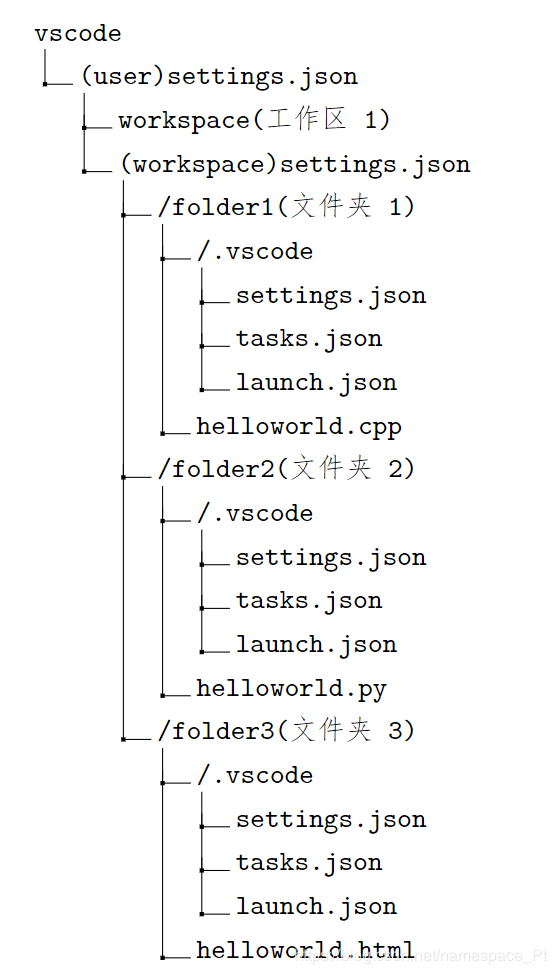
可以看到,
- vscode下有全局设置settings.json;之后是工作区,和工作区设置settings.json,一个工作区包含了多个文件夹;
- 每个文件夹中有相同的.vscode文件夹,这个文件夹中的三个文件settings.json,tasks.json,launch.json,它们就是配置的核心。
- 每个文件夹通过配置可以编译运行不同语言的文件:c++,python和html,同时可以通过同一个工作区直接访问,这就是vscode的集成性和方便性。
现在,我们一项一项来说:
文件结构
vscode提供三级文件结构,从工作区到文件夹到单个文件:
- 工作区是vscode提供的文件夹的“集合”,一个工作区可以包含多个文件夹,正如一个文件夹可以包含多个文件。
- 文件夹是vscode配置的最小工作单元,vscode无法为单个文件提供配置。
- 在不同的工作区中我们可以选择启用/禁用不同的拓展插件以节省内存
settings.json
在这个json文件中,我们可以通过键值对的方式设置vscode内置的或拓展插件的各项属性,其中就包括外部编译器地址、各项编译偏好等等。
同时,vscode提供层层嵌套的settings,

- 从高到低分别是全局设置、工作区设置、文件夹设置; 全局设置默认通过ctrl+shift+P后输入settings.json打开。
- 我们在文件夹设置中设置的属性会覆盖工作区设置、也会覆盖全局设置,反之不成立。
- 因此,对于全局的设置,比如编辑器字体等,我们将其在user settings.json中进行设置,工作区暂不叙述,而对于每个文件夹都不同的设置,比如想在不同的文件夹中使用不同的python环境,我们选择在folder settings中(即文件夹内部的settings.json中)设置相应内容。
tasks.json
- 很多时候,像在使用linux系统的时候,我们会自定义一些小脚本来方便的实现一些功能,vscode就使用tasks来支持快捷实现一些方便的功能。
- 有些拓展插件会有封装好的task可以直接执行,我们也可以自定义各种各样的task,例如实现“编译当前文件”,“删除多余文件”等等操作。
- tasks比直接定义.bat文件更方便之处在于vscode提供了诸多快捷访问特定路径的方式,如当前文件夹的路径,vscode打开的文件夹的路径,当前文件的路径,当前文件不带拓展名的名称等等。
- tasks.json中定义的任务仅能在当前文件夹(包含该文件夹的工作区)中使用。
launch.json
这其中的内容主要是用来对调试提供支持。**针对不同语言的拓展插件会提供不同的模板。**按f5可以选择模板并生成文件。
vscode的优势
- 好看
- 集成性很强
- 配置好了后很方便,随时可以自己加功能
- 拓展极其丰富
配置实例
了解了vscode的配置原理,我在下面给出一些我自己配置的内容以供参考。
settings.json全局配置
{
	//vscode的默认终端,此处设置为cmd
 	"terminal.integrated.shell.windows": "C:\\WINDOWS\\System32\\cmd.exe",
 	//拖拽移动文件时不要确认提示
 	"explorer.confirmDragAndDrop": false,
 	//手动升级vscode
 	"update.mode": "manual",
 	//自动保存,此处设置为永远自动保存
 	"files.autoSave": "afterDelay",
 	//task的下拉列表中显示历史常用的个数
 	"task.quickOpen.history": 0,
}
对python
{
	//控制是否激活pylint
 	//"python.linting.pylintEnabled": true,
 	"python.linting.enabled": true,
 	//如果使用pylint可能会导致奇怪的报错,加上这几句可以取消
 	//"python.linting.pylintArgs": [
 	// "--generate-members"
 	//],
 	//是否在自动补全的函数后自动添加括号
 	"python.autoComplete.addBrackets": false,
 	//是否使用python插件内部的自动补全功能
 	"python.jediEnabled": true,
 	//python环境的路径
 	"python.pythonPath": "C:\\apps\\Anaconda\\python.exe",
 	//python自动补全的搜索路径
 	"python.autoComplete.extraPaths": [
 	 "C:/apps/Anaconda/Lib/site-packages/",
 	 "C:/apps/Anaconda/Scripts/"
    ],
}
对c,c++
{
 "files.associations": {
 "*.tcc": "cpp",
 "array": "cpp",
 "atomic": "cpp",
 "cctype": "cpp",
 "clocale": "cpp",
 "cmath": "cpp",
 "cstdarg": "cpp",
 "cstddef": "cpp",
 "cstdint": "cpp",
 "cstdio": "cpp",
 "cstdlib": "cpp",
 "cwchar": "cpp",
 "cwctype": "cpp",
 "deque": "cpp",
 "unordered_map": "cpp",
 "vector": "cpp",
 "exception": "cpp",
 "algorithm": "cpp",
 "functional": "cpp",
 "iterator": "cpp",
 "memory": "cpp",
 "memory_resource": "cpp",
 "numeric": "cpp",
 "optional": "cpp",
 "random": "cpp",
 "string": "cpp",
 "string_view": "cpp",
 "system_error": "cpp",
 "tuple": "cpp",
 "type_traits": "cpp",
 "utility": "cpp",
 "fstream": "cpp",
 "initializer_list": "cpp",
 "iosfwd": "cpp",
 "iostream": "cpp",
 "istream": "cpp",
 "limits": "cpp",
 "new": "cpp",
 "ostream": "cpp",
 "sstream": "cpp",
 "stdexcept": "cpp",
 "streambuf": "cpp",
 "typeinfo": "cpp"
 }
}
对latex
{
	//编译方式
	"latex-workshop.latex.tools": [
 {
 "name": "latexmk",
 "command": "latexmk",
 "args": [
 "-synctex=1",
 "-interaction=nonstopmode",
 "-file-line-error",
 "-pdf",
 "%DOC%"
 ]
 },
 {
 "name": "xelatex",
 "command": "xelatex",
 "args": [
 "-synctex=1",
 "-interaction=nonstopmode",
 "-file-line-error",
 "%DOC%"
 ]
 },
 {
 "name": "pdflatex",
 "command": "pdflatex",
 "args": [
 "-synctex=1",
 "-interaction=nonstopmode",
 "-file-line-error",
 "%DOC%"
 ]
 },
 {
 "name": "bibtex",
 "command": "bibtex",
 "args": [
 "%DOCFILE%"
 ]
 }
 ],
	"latex-workshop.latex.recipes": [
 {
 "name": "xelatex",
 "tools": [
 "xelatex"
 ]
  },
 {
 "name": "latexmk",
 "tools": [
 "latexmk"
 ]
 },
 {
 "name": "pdflatex -> bibtex -> pdflatex*2",
 "tools": [
 "pdflatex",
 "bibtex",
 "pdflatex",
 "pdflatex"
 ]
 }
 ],
 //需要清除文件的后缀
 "latex-workshop.latex.clean.fileTypes": [
 "*.aux",
 "*.bbl",
 "*.blg",
 "*.idx",
 "*.ind",
 "*.lof",
 "*.lot",
 "*.out",
 "*.toc",
 "*.acn",
 "*.acr",
 "*.alg",
 "*.glg",
 "*.glo",
 "*.gls",
 "*.ist",
 "*.fls",
 "*.log",
 "*.fdb_latexmk",
 "*.gz"
 ],
 //不要显示错误弹窗
 "latex-workshop.message.error.show": false,
 //不要显示信息弹窗
 "latex-workshop.message.information.show": false,
 //不要显示警报弹窗
 "latex-workshop.message.warning.show": false,
 //保存时不要自动编译
 "latex-workshop.latex.autoBuild.run": "never",
 //默认在右边tab预览
 "latex-workshop.view.pdf.viewer": "tab",
}
tasks.json对C/C++
{
 "version": "2.0.0",
 "command": "g++",
 "args": ["-g","${file}","-o","${fileBasenameNoExtension}.exe"], // 编译命令参数
 "problemMatcher": {
 "owner": "cpp",
 "fileLocation": ["relative", "\\"],
 "pattern": {
 "regexp": "^(.*):(\\d+):(\\d+):\\s+(warning|error):\\s+(.*)$",
 "file": 1,
 "line": 2,
 "column": 3,
 "severity": 4,
 "message": 5
 }
 }
}
用asymptote画图后进行编译.asy文件,删除多余文件,将结果移动至特定文件夹
{
 // See https://go.microsoft.com/fwlink/?LinkId=733558
 // for the documentation about the tasks.json format
 "version": "2.0.0",
 "tasks": [
 //编译
 {
 //在task列表中显示的文字
 "label": "Generate EPS",
 //运行环境
 "type": "shell",
 //命令
 "command": "asy",
 //参数
 "args": [
 "-f",
 "eps",
 //$开头的都是vscode提供的封装好的变量,具体内容
 //可以自己尝试
 "${file}"
 ],
 //所述属组
 "group": "build",
 //报错处理
 "problemMatcher": []
 },
 //删除文件
 {
 "label": "Delete FILE",
 "type": "shell",
 "command": "del",
 "args": [
 "*.aux",
 "*.log",
 "*.dvi",
 "*.pdf"
 ],
 //设置为none的task不会在build task的下拉列表中展示
 "group": "none",
 "problemMatcher": []
 },
 //将生成的eps移动至相应文件夹
 {
 "label": "Move EPS",
 "type": "shell",
 "command": "move",
 "args": [
 "/Y",
 //$开头的都是vscode提供的封装好的变量,具体内容
 //可以自己尝试
 "${workspaceFolder}\\${fileBasenameNoExtension}.eps",
 "C:\\Pt_Latex\\Reources\\"
 ],
 "group": "build",
 //在运行这个任务之前,需要提前运行的任务
 "dependsOn": [
 "Delete FILE"
 ],
 "problemMatcher": []
 }
 ]
}
launch.json
对C/C++
{
 "version": "0.2.0",
 "configurations": [

 {
 "name": "(gdb) Launch", // 配置名称,将会在启动配置的下拉菜单中显示
 "type": "cppdbg", // 配置类型,这里只能为cppdbg
 "request": "launch", // 请求配置类型,可以为launch(启动)或attach(附加)
 "program": "${workspaceFolder}/${fileBasenameNoExtension}.exe",// 将要进行调试的程序的路径
 "args": [], // 程序调试时传递给程序的命令行参数,一般设为空即可
 "stopAtEntry": false, // 设为true时程序将暂停在程序入口处,一般设置为false
 "cwd": "${workspaceFolder}", // 调试程序时的工作目录,一般为${workspaceFolder}即代码所在目录
 "environment": [],
 "externalConsole": true, // 调试时是否显示控制台窗口,一般设置为true显示控制台
 "MIMode": "gdb",
 "miDebuggerPath": "C:\\apps\\MinGW\\bin\\gdb.exe", // miDebugger的路径,注意这里要与MinGw的路径对应
 "preLaunchTask": "g++", // 调试会话开始前执行的任务,一般为编译程序,c++为g++, c为gcc
 "setupCommands": [
 	{
 		"description": "Enable pretty-printing for gdb",
  "text": "-enable-pretty-printing",
  "ignoreFailures": true
 	}
 ]
 }
 ]
}
对python(默认的就成)
{
 // 使用 IntelliSense 了解相关属性。
 // 悬停以查看现有属性的描述。
 // 欲了解更多信息,请访问: https://go.microsoft.com/fwlink/?linkid=830387
 "version": "0.2.0",
 "configurations": [

 {
 "name": "Python: 当前文件",
 "type": "python",
 "request": "launch",
 "program": "${file}",
 "console": "integratedTerminal",
 //是否在程序开始处停止
 "stopOnEntry": false
 }
 ]
}
到此这篇关于vscode的几项基本配置的文章就介绍到这了,更多相关vscode基本配置内容请搜索脚本之家以前的文章或继续浏览下面的相关文章希望大家以后多多支持脚本之家!
您可能感兴趣的文章:- vscode 配置 python3开发环境的方法
- vscode中eslint插件的配置(prettier配置无效)
- VSCode配置Git的方法步骤随记
- VSCode下好用的Python插件及配置
- VSCode下配置python调试运行环境的方法
- 如何使用VSCode愉快的写Python于调试配置步骤
- VSCode配置react开发环境的步骤


 咨 询 客 服