1 准备工作
安装好Linux操作系统这里选择的是Linux 7:
[root@slave1 software]# cat /etc/redhat-release
CentOS Linux release 7.6.1810 (Core)
关闭防火墙 和 Selinux:
[root@slave1 software]# systemctl stop firewalld
[root@slave1 software]# systemctl disable firewalld
[root@slave1 software]# vi /etc/selinux/config
[root@slave1 software]# cat /etc/selinux/config
# This file controls the state of SELinux on the system.
# SELINUX= can take one of these three values:
# enforcing - SELinux security policy is enforced.
# permissive - SELinux prints warnings instead of enforcing.
# disabled - No SELinux policy is loaded.
SELINUX=disabled
# SELINUXTYPE= can take one of three values:
# targeted - Targeted processes are protected,
# minimum - Modification of targeted policy. Only selected processes are protected.
# mls - Multi Level Security protection.
SELINUXTYPE=targeted
创建DM用户:
[root@slave1 software]# groupadd dinstall
[root@slave1 software]# useradd -g dinstall -m -d /home/dmdba -s /bin/bash dmdba
[root@slave1 software]# passwd dmdba
Changing password for user dmdba.
New password:
BAD PASSWORD: The password is shorter than 8 characters
Retype new password:
passwd: all authentication tokens updated successfully.
[root@slave1 software]#
创建目录:存储dm数据库文件的空间需要提前规划并挂载好,我这里放在/dm目录下:
[root@slave1 software]# mkdir -p /dm/dmdbms
[root@slave1 software]# mkdir -p /dm/dmarch
[root@slave1 software]# mkdir -p /dm/dmbak
[root@slave1 software]# chown -R dmdba:dinstall /dm/
[root@slave1 software]# chmod -R 775 /dm/
配置系统限制,在/etc/security/limits.conf 文件中添加如下内容:
[root@slave1 software]# vim /etc/security/limits.conf
dmdba soft nofile 65536
dmdba hard nofile 65536
配置环境变量:在dmdba用户的~/.bash_profile 里添加如下内容:
export DM_HOME="/dm/dmdbms"
export LD_LIBRARY_PATH="/dm/dmdbms/bin:$LD_LIBRARY_PATH"
export PATH="/dm/dmdbms/bin:$PATH"
注意,在DM 软件安装时会自动添加DM_HOME 和 LD_LIBRARY_PATH 变量,这里只需要添加PATH即可。
2 安装DM 数据库
复制安装文件: 将DM的ISO上传到Linux系统,并挂载:
[root@slave1 software]# mount dm7开发版(rh7-64)20190917.iso /mnt/
mount: /dev/loop0 is write-protected, mounting read-only
[root@slave1 software]# cd /mnt/
[root@slave1 mnt]# ls
DMInstall.bin DM_Install_en.pdf DM_Install_zh.pdf release_en.txt release_zh.txt
将安装文件复制到/dm 目录下并修改安装文件权限:
[root@slave1 mnt]# pwd
/mnt
[root@slave1 mnt]# cp ./DMInstall.bin /dm/
[root@slave1 mnt]# cd /dm
[root@slave1 dm]# ll
total 573076
drwxrwxr-x 2 dmdba dinstall 6 Dec 9 23:08 dmarch
drwxrwxr-x 2 dmdba dinstall 6 Dec 9 23:08 dmbak
drwxrwxr-x 2 dmdba dinstall 6 Dec 9 23:08 dmdbms
-r-xr-xr-x 1 root root 586828259 Dec 9 23:14 DMInstall.bin
[root@slave1 dm]# chown dmdba:dinstall DMInstall.bin
[root@slave1 dm]# ll
total 573076
drwxrwxr-x 2 dmdba dinstall 6 Dec 9 23:08 dmarch
drwxrwxr-x 2 dmdba dinstall 6 Dec 9 23:08 dmbak
drwxrwxr-x 2 dmdba dinstall 6 Dec 9 23:08 dmdbms
-r-xr-xr-x 1 dmdba dinstall 586828259 Dec 9 23:14 DMInstall.bin
用dmdba用户执行./DMInstall.bin -i 程序,开始安装:
[root@slave1 dm]$ pwd
/dm
[root@slave1 dm]$ ./DMInstall.bin -i
Please select the installer's language (E/e:English C/c:Chinese) [E/e]:c
解压安装程序.........
core file size (blocks, -c) 0
data seg size (kbytes, -d) unlimited
scheduling priority (-e) 0
file size (blocks, -f) unlimited
pending signals  (-i) 3756
max locked memory (kbytes, -l) 64
max memory size (kbytes, -m) unlimited
open files  (-n) 1024
pipe size (512 bytes, -p) 8
POSIX message queues (bytes, -q) 819200
real-time priority (-r) 0
stack size (kbytes, -s) 8192
cpu time (seconds, -t) unlimited
max user processes (-u) 3756
virtual memory (kbytes, -v) unlimited
file locks  (-x) unlimited
可打开文件数过少,建议至少设置为65536或更多。
欢迎使用达梦数据库安装程序
是否输入Key文件路径? (Y/y:是 N/n:否) [Y/y]:n
是否设置时区? (Y/y:是 N/n:否) [Y/y]:y
设置时区:
[ 1]: GTM-12=日界线西
[ 2]: GTM-11=萨摩亚群岛
[ 3]: GTM-10=夏威夷
[ 4]: GTM-09=阿拉斯加
[ 5]: GTM-08=太平洋时间(美国和加拿大)
[ 6]: GTM-07=亚利桑那
[ 7]: GTM-06=中部时间(美国和加拿大)
[ 8]: GTM-05=东部部时间(美国和加拿大)
[ 9]: GTM-04=大西洋时间(美国和加拿大)
[10]: GTM-03=巴西利亚
[11]: GTM-02=中大西洋
[12]: GTM-01=亚速尔群岛
[13]: GTM=格林威治标准时间
[14]: GTM+01=萨拉热窝
[15]: GTM+02=开罗
[16]: GTM+03=莫斯科
[17]: GTM+04=阿布扎比
[18]: GTM+05=伊斯兰堡
[19]: GTM+06=达卡
[20]: GTM+07=曼谷,河内
[21]: GTM+08=中国标准时间
[22]: GTM+09=汉城
[23]: GTM+10=关岛
[24]: GTM+11=所罗门群岛
[25]: GTM+12=斐济
[26]: GTM+13=努库阿勒法
[27]: GTM+14=基里巴斯
请选择设置时区 [21]:21
安装类型:
1 典型安装
2 服务器
3 客户端
4 自定义
请选择安装类型的数字序号 [1 典型安装]:1
所需空间: 963M
请选择安装目录 [/opt/dmdbms]:/dm/dmdbms
可用空间: 8G
是否确认安装路径(/dm/dmdbms)? (Y/y:是 N/n:否) [Y/y]:y
安装前小结
安装位置: /dm/dmdbms
所需空间: 963M
可用空间: 8G
版本信息:
有效日期:
安装类型: 典型安装
是否确认安装? (Y/y:是 N/n:否):y
2019-12-09 23:17:21
[INFO] 安装达梦数据库...
2019-12-09 23:17:22
[INFO] 安装 基础 模块...
2019-12-09 23:17:32
[INFO] 安装 服务器 模块...
2019-12-09 23:17:33
[INFO] 安装 客户端 模块...
2019-12-09 23:17:44
[INFO] 安装 驱动 模块...
2019-12-09 23:17:55
[INFO] 安装 手册 模块...
2019-12-09 23:17:55
[INFO] 安装 服务 模块...
2019-12-09 23:17:59
[INFO] 移动ant日志文件。
2019-12-09 23:17:59
[INFO] 更改安装目录权限完成。
2019-12-09 23:17:59
[INFO] 正在启动DmAPService服务...
2019-12-09 23:18:01
[INFO] 启动DmAPService服务成功。
2019-12-09 23:18:01
[INFO] 安装达梦数据库完成。
安装结束
3 创建数据库实例
[root@slave1 bin]$ pwd
/dm/dmdbms/bin
[root@slave1 bin]$ ./dminit PATH=/dm/dmdbms/data DB_NAME=dmdba INSTANCE_NAME=DMDBA CTL_PATH=/dm/dmdbms/data/dmdba/dm.ctl CASE_SENSITIVE=N CHARSET=1
initdb V7.6.0.197-Build(2019.09.12-112648)ENT
db version: 0x7000a
file dm.key not found, use default license!
License will expire on 2020-09-12

 log file path: /dm/dmdbms/data/dmdba/dmdba01.log


 log file path: /dm/dmdbms/data/dmdba/dmdba02.log

write to dir [/dm/dmdbms/data/dmdba].
create dm database success. 2019-12-09 23:25:17
4 注册数据库服务
注册的shell 脚本dm_service_installer.sh在DM_HOME/script/root目录下,执行注册时需要使用root用户执行。
[root@slave1 bin]# cd /dm/dmdbms/script/root
[root@slave1 root]# ./dm_service_installer.sh -t dmserver -i /dm/dmdbms/data/dmdba/dm.ini -p dmdba
Created symlink from /etc/systemd/system/multi-user.target.wants/DmServicedmdba.service to /usr/lib/systemd/system/DmServicedmdba.service.
创建服务(DmServicedmdba)完成
5 启动数据库
[root@slave1 root]# systemctl enable DmServicedmdba.service
[root@slave1 root]# systemctl start DmServicedmdba
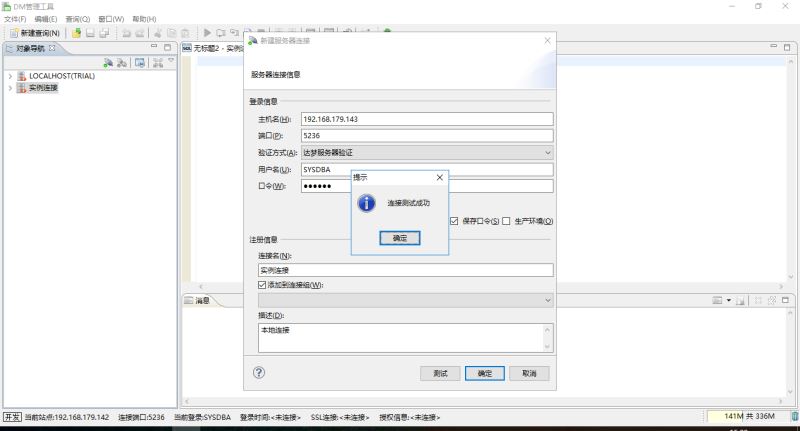
6 客户端连接
出现如下画面,说明安装成功,可以正常使用了。
总结
以上所述是小编给大家介绍的Centos7 安装达梦数据库的教程,希望对大家有所帮助,如果大家有任何疑问请给我留言,小编会及时回复大家的。在此也非常感谢大家对脚本之家网站的支持!
如果你觉得本文对你有帮助,欢迎转载,烦请注明出处,谢谢!


 咨 询 客 服