一、简单配置nginx的动静分离
假设web1为静态服务器,web2为动态服务器,node2做代理
1.1 根据目录分开
web1只处理静态请求
[root@web1 ~]# mkdir -p /var/www/www/image
[root@web1 ~]# yum -y install lrzsz
[root@web1 ~]# cd /var/www/www/image/
[root@web1 image]# rz
[root@web1 image]# ll
-rw-r--r--. 1 root root 156848 Mar 13 11:31 nhrzyx.png
[root@web2 ~]# vim /etc/httpd/conf/httpd.conf
 DocumentRoot "/var/www/www"
[root@web2 ~]# systemctl restart httpd
web2只处理动态请求
[root@web2 ~]# mkdir -p /var/www/www/dynamic
[root@web2 ~]# echo dynamic10 > /var/www/www/dynamic/index.html
[root@web2 ~]# vim /etc/httpd/conf/httpd.conf
 DocumentRoot "/var/www/www"
[root@web2 ~]# systemctl restart httpd
访问测试
http://172.25.254.134/image/nhrzyx.png
http://172.25.254.135/dynamic/index.html
1.2 通过请求分离
配置代理
[root@lb01 conf]# vim nginx.conf
worker_processes 1;
events {
  worker_connections 1024;
}
http {
  include    mime.types;
  default_type application/octet-stream;
  sendfile    on;
  keepalive_timeout 65;
upstream stack_pools {
    server 172.25.254.134:80 weight=5;
}
upstream dynamic_pools {
    server 172.25.254.135:80 weight=5;
}
  server {
    listen    80;
    server_name www.lbtest.com;
    location / {
      root  html;
      index index.html index.htm;
      proxy_set_header Host $host;
      proxy_pass http://dynamic_pools;
    }
    location /image/ {
      proxy_set_header Host $host;
    proxy_pass http://stack_pools;
    }
    location /dynamic/ {
      proxy_set_header Host $host;
    proxy_pass http://dynamic_pools;
    }
  }
}
[root@lb01 conf]# nginx -s reload
配置hosts ,浏览器访问测试
172.25.254.131 www.lbtest.com
http://www.lbtest.com/image/nhrzyx.png
http://www.lbtest.com/dynamic/
1.3 根据扩展名分离
[root@lb01 conf]# vim nginx.conf

worker_processes 1;
events {
  worker_connections 1024;
}
http {
  include    mime.types;
  default_type application/octet-stream;
  sendfile    on;
  keepalive_timeout 65;
upstream stack_pools {
    server 172.25.254.134:80 weight=5;
}
upstream dynamic_pools {
    server 172.25.254.135:80 weight=5;
}
  server {
    listen    80;
    server_name www.lbtest.com;
    location / {
      root  html;
      index index.html index.htm;
      proxy_set_header Host $host;
      proxy_pass http://dynamic_pools;
    }
    location ~ .*.(jpg|png|gif|css|js|swf|bmp|jsp|php|asp)$ {
    proxy_set_header Host $host;
    proxy_pass http://stack_pools;
    }
  }
}
[root@lb01 conf]# nginx -s reload
http://www.lbtest.com/image/nhrzyx.png
1.4 根据客户端标识进行分离
http {
  include    mime.types;
  default_type application/octet-stream;
  sendfile    on;
  keepalive_timeout 65;
upstream stack_pools {
    server 172.25.254.134:80 weight=5;
}
upstream dynamic_pools {
    server 172.25.254.135:80 weight=5;
}
  server {
    listen    80;
    server_name www.lbtest.com;
    location / {
        if ($http_user_agent ~* "MSIE")
        {
            proxy_pass http://dynamic_pools;
        }
        if ($http_user_agent ~* "firefox")
        {
            proxy_pass http://stack_pools;
        }
    }
    proxy_set_header Host $host;
    }
}
[root@web1 image]# echo stack_web>> /var/www/www/test.html
[root@web1 image]# systemctl restart httpd

[root@web2 ~]# echo dynamic_web>>/var/www/www/test.html
[root@web2 ~]# systemctl restart httpd
分别使用IE和火狐浏览器访问
http://www.lbtest.com/test.html
1.5 使用客户端的pc和移动分离
http {
  include    mime.types;
  default_type application/octet-stream;
  sendfile    on;
  keepalive_timeout 65;
upstream stack_pools {
    server 172.25.254.134:80 weight=5;
}
upstream dynamic_pools {
    server 172.25.254.135:80 weight=5;
}
  server {
    listen    80;
    server_name www.lbtest.com;
    location / {
        if ($http_user_agent ~* "iphone")
        {
            proxy_pass http://dynamic_pools;
        }
        if ($http_user_agent ~* "android")
        {
            proxy_pass http://stack_pools;
        }
    }
    proxy_set_header Host $host;
    }
}
分别使用安卓和iphone访问测试
http://www.lbtest.com/test.html
二 、优化
[root@node2 ~]# vim /etc/sysctl.conf
net.ipv4.tcp_fin_timeout = 2
net.ipv4.tcp_tw_recycle = 1
net.ipv4.tcp_tw_reuse = 1
net.ipv4.tcp_syncookies = 1
net.ipv4.tcp_keepalive_time =600
net.ipv4.ip_local_port_range = 4000 65000
net.ipv4.tcp_max_syn_backlog = 16348
net.ipv4.tcp_max_tw_buckets = 36000
net.ipv4.tcp_syn_retries = 1
net.ipv4.tcp_synack_retries = 1
net.ipv4.tcp_max_orphans = 16384
net.core.somaxconn = 16384
net.core.netdev_max_backlog = 18364
[root@node2 ~]# sysctl -p
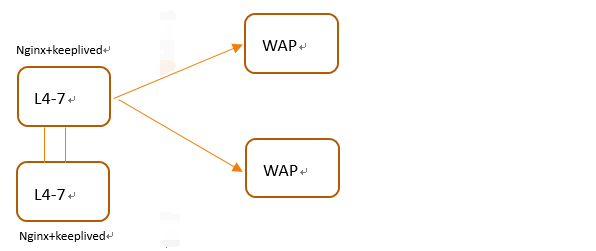
简单介绍keepalive和nginx
配置keepalived实现nginx负载均衡的高可用
keepalive更适合于见得IP漂移,如果资源服务有控制,heartbeat更适合,比如存储方向的高可用
三、 nginx反向代理的健康检查
nginx做反向代理的时候,当后端就的服务器出现宕机的时候,ngixn不能把这台realserver剔除upstream的,所以还会把请求转发到后端的这台realserve上,虽然nginx可以在localtion中启用proxy_next_upstream来解决返回给客户的错误页面,但这个还会会把请求转发转给这台服务器,然后再转发别的服务器,这样就浪费了一次转发,借助淘宝团队开发的nginx模块nginx_upstream_check_module来检测后方的realserver的健康状态,如果后端服务器不可用,则所有的请求不转发到这台服务器
check interval=5000 rise=1 fall=3 timeout=4000;
3.1 直接添加到配置文件
[root@node2 ~]# vim /usr/local/nginx/conf/nginx.conf
worker_processes 1;
events {
  worker_connections 1024;
}
http {
  include    mime.types;
  default_type application/octet-stream;
  sendfile    on;
  keepalive_timeout 65;
upstream web_pools {
    server 172.25.254.134:80 weight=5;
    server 172.25.254.135:80 weight=5;
#    server 172.25.254.158:80 weight=5 backup;
check interval=5000 rise=1 fall=3 timeout=4000;

}
  server {
    listen    80;
    server_name www.lbtest.com;
    location / {
      # root  html;
      # index index.html index.htm;
      proxy_set_header Host $host;
      proxy_pass http://web_pools;
    }
  }
}
[root@node2 ~]# nginx -t
nginx: [emerg] unknown directive "check" in /usr/local/nginx/conf/nginx.conf:14
nginx: configuration file /usr/local/nginx/conf/nginx.conf test failed
检查失败
下载nginx的模块https://github.com/yaoweibin/nginx_upstream_check_module,使用nginx打上模块的安装,当做nginx的升级
3.2 下载模块
[root@node2 nginx-1.12.2]# yum -y install git

[root@node2 nginx-1.12.2]# git clone https://github.com/yaoweibin/nginx_upstream_check_module.git

[root@node2 nginx-1.12.2]# ll
drwxr-xr-x. 7 root root 4096 Apr 13 00:57 nginx_upstream_check_module
[root@node2 nginx-1.12.2]# cd nginx_upstream_check_module/

[root@node2 nginx_upstream_check_module]# ll
-rw-r--r--. 1 root root   0 Apr 13 00:57 CHANGES
-rw-r--r--. 1 root root  7921 Apr 13 00:57 check_1.11.1+.patch
-rw-r--r--. 1 root root  8330 Apr 13 00:57 check_1.11.5+.patch
-rw-r--r--. 1 root root  8060 Apr 13 00:57 check_1.12.1+.patch
-rw-r--r--. 1 root root  8054 Apr 13 00:57 check_1.14.0+.patch
-rw-r--r--. 1 root root  5483 Apr 13 00:57 check_1.2.1.patch
-rw-r--r--. 1 root root  7130 Apr 13 00:57 check_1.2.2+.patch
-rw-r--r--. 1 root root  7094 Apr 13 00:57 check_1.2.6+.patch
-rw-r--r--. 1 root root  6791 Apr 13 00:57 check_1.5.12+.patch
-rw-r--r--. 1 root root  8295 Apr 13 00:57 check_1.7.2+.patch
-rw-r--r--. 1 root root  8346 Apr 13 00:57 check_1.7.5+.patch
-rw-r--r--. 1 root root  8509 Apr 13 00:57 check_1.9.2+.patch
-rw-r--r--. 1 root root  6943 Apr 13 00:57 check.patch
-rw-r--r--. 1 root root  749 Apr 13 00:57 config
drwxr-xr-x. 2 root root   43 Apr 13 00:57 doc
-rw-r--r--. 1 root root  1709 Apr 13 00:57 nginx-sticky-module.patch
drwxr-xr-x. 2 root root   29 Apr 13 00:57 nginx-tests
-rw-r--r--. 1 root root 112010 Apr 13 00:57 ngx_http_upstream_check_module.c
-rw-r--r--. 1 root root  529 Apr 13 00:57 ngx_http_upstream_check_module.h
-rw-r--r--. 1 root root  2848 Apr 13 00:57 ngx_http_upstream_jvm_route_module.patch
-rw-r--r--. 1 root root 11509 Apr 13 00:57 README
drwxr-xr-x. 6 root root   79 Apr 13 00:57 test
-rw-r--r--. 1 root root  3342 Apr 13 00:57 upstream_fair.patch
drwxr-xr-x. 2 root root   81 Apr 13 00:57 util
3.3 打补丁
[root@node2 nginx_upstream_check_module]# cd ../

[root@node2 nginx-1.12.2]# yum -y install patch
注:因nginx版本更新,1.12以上版本的nginx,补丁为check_1.11.5+.patch
[root@node2 nginx-1.12.2]# patch -p0 < ./nginx_upstream_check_module/check_1.11.5+.patch
patching file src/http/modules/ngx_http_upstream_hash_module.c
patching file src/http/modules/ngx_http_upstream_ip_hash_module.c
patching file src/http/modules/ngx_http_upstream_least_conn_module.c
patching file src/http/ngx_http_upstream_round_robin.c
patching file src/http/ngx_http_upstream_round_robin.h
3.4 编译安装
[root@node2 nginx-1.12.2]# ./configure --prefix=/usr/local/nginx \

> --user=nginx --group=nginx \

> --with-http_ssl_module \

> --with-http_realip_module \

> --with-http_addition_module \

> --with-http_gzip_static_module \

> --with-http_stub_status_module \

> --with-http_sub_module \

> --with-pcre \

> --add-module=./nginx_upstream_check_module
出现一个新的目录 为objs
[root@node2 nginx-1.12.2]# ll
drwxr-xr-x. 4 root root 187 Apr 13 01:04 objs
[root@node2 nginx-1.12.2]# make
sed -e "s|%%PREFIX%%|/usr/local/nginx|" \

  -e "s|%%PID_PATH%%|/usr/local/nginx/logs/nginx.pid|" \

  -e "s|%%CONF_PATH%%|/usr/local/nginx/conf/nginx.conf|" \

  -e "s|%%ERROR_LOG_PATH%%|/usr/local/nginx/logs/error.log|" \

  < man/nginx.8 > objs/nginx.8
make[1]: Leaving directory `/usr/local/src/nginx-1.12.2'
[root@node2 nginx-1.12.2]# ll objs/
drwxr-xr-x. 3 root root   41 Apr 13 01:04 addon
-rw-r--r--. 1 root root  16895 Apr 13 01:04 autoconf.err
-rw-r--r--. 1 root root  42396 Apr 13 01:04 Makefile
-rwxr-xr-x. 1 root root 5993600 Apr 13 01:06 nginx  #nginx新的可执行文件
-rw-r--r--. 1 root root  5341 Apr 13 01:06 nginx.8
-rw-r--r--. 1 root root  7202 Apr 13 01:04 ngx_auto_config.h
-rw-r--r--. 1 root root   657 Apr 13 01:03 ngx_auto_headers.h
-rw-r--r--. 1 root root  6412 Apr 13 01:04 ngx_modules.c
-rw-r--r--. 1 root root  87120 Apr 13 01:06 ngx_modules.o
drwxr-xr-x. 9 root root   91 Apr 3 22:38 src
备份就得ngxin,并拷贝新的nginx
[root@node2 nginx-1.12.2]# cd /usr/local/nginx/sbin/

[root@node2 sbin]# mv nginx nginx.bak

[root@node2 sbin]# cp /usr/local/src/nginx-1.12.2/objs/nginx /usr/local/nginx/sbin

[root@node2 sbin]# /usr/local/nginx/sbin/nginx -s stop
nginx: [emerg] getpwnam("nginx") failed
[root@node2 sbin]# id nginx
id: nginx: no such user
[root@node2 sbin]# useradd nginx

[root@node2 sbin]# id nginx
uid=1002(nginx) gid=1002(nginx) groups=1002(nginx)
[root@node2 sbin]# /usr/local/nginx/sbin/nginx -s stop

[root@node2 sbin]# /usr/local/nginx/sbin/nginx

[root@node2 ~]# nginx -t
nginx: the configuration file /usr/local/nginx/conf/nginx.conf syntax is ok
nginx: configuration file /usr/local/nginx/conf/nginx.conf test is successful
成功安装
3.5 配置
worker_processes 1;
events {
  worker_connections 1024;
}
http {
  include    mime.types;
  default_type application/octet-stream;
  sendfile    on;
  keepalive_timeout 65;
upstream web_pools {
    server 172.25.254.134:80 weight=5;
    server 172.25.254.135:80 weight=5;
#    server 172.25.254.158:80 weight=5 backup;
check interval=5000 rise=1 fall=3 timeout=4000;

}
  server {
    listen    80;
    server_name www.lbtest.com;
    location / {
      proxy_set_header Host $host;
      proxy_pass http://web_pools;
    }
    location /nstatus{
    check_status;
    access_log off;
    }
  }
}
[root@node2 conf]# nginx -s reload
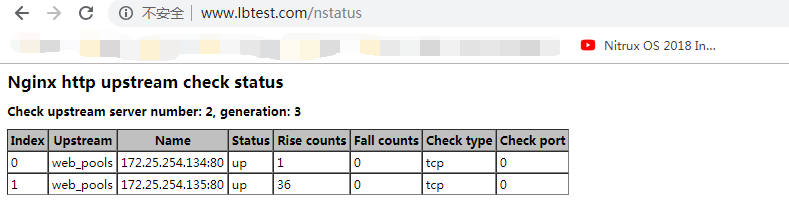
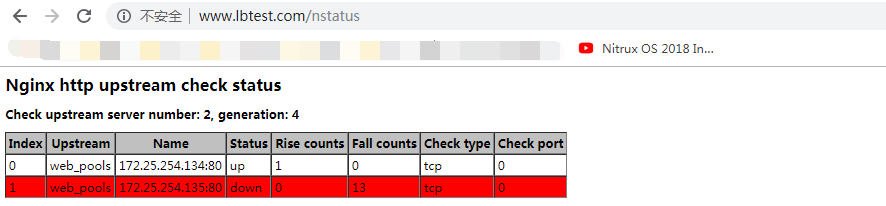
3.6 访问测试
两个状态正常
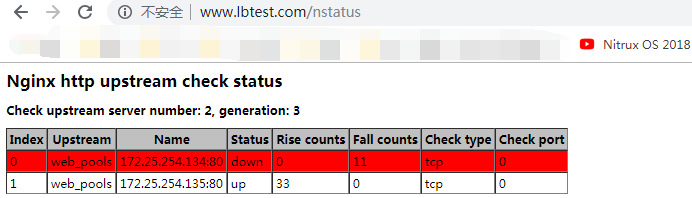
关掉一个
[root@web1 image]# systemctl stop httpd
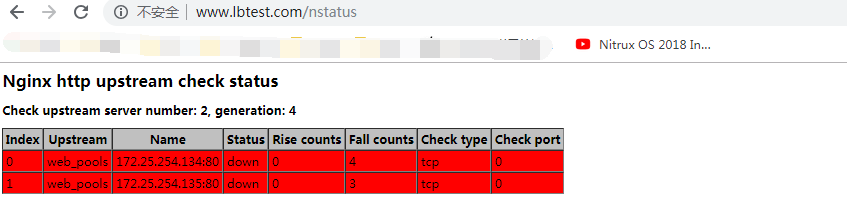
关掉两个
[root@web2 ~]# systemctl stop httpd
开启一个
[root@web1 image]# systemctl start httpd
[root@web2 ~]# systemctl restart httpd
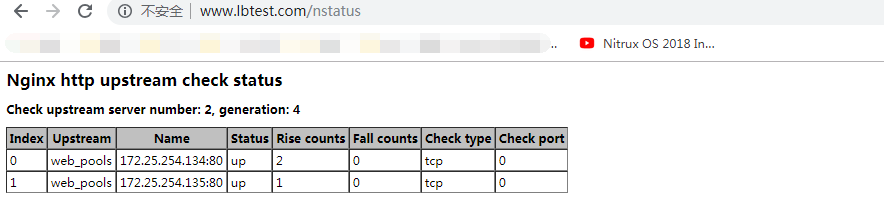
成功实现后端检查功能
以上就是本文的全部内容,希望对大家的学习有所帮助,也希望大家多多支持脚本之家。


 咨 询 客 服