本文实例讲述了Laravel5.1框架自带权限控制系统 ACL用法。分享给大家供大家参考,具体如下:
Laravel在5.1.11版本中加入了Authorization,可以让用户自定义权限,今天分享一种定义权限系统的方法。
1. 创建角色与权限表
使用命令行创建角色与权限表:
php artisan make:migration create_permissions_and_roles --create=permissions
之后打开刚刚创建的文件,填入下面的代码:
public function up()
{
Schema::create('roles', function (Blueprint $table) {
$table->increments('id');
$table->string('name');
$table->string('label');
$table->string('description')->nullable();
$table->timestamps();
});
Schema::create('permissions', function (Blueprint $table) {
$table->increments('id');
$table->string('name');
$table->string('label');
$table->string('description')->nullable();
$table->timestamps();
});
Schema::create('permission_role', function (Blueprint $table) {
$table->integer('permission_id')->unsigned();
$table->integer('role_id')->unsigned();
$table->foreign('permission_id')
->references('id')
->on('permissions')
->onDelete('cascade');
$table->foreign('role_id')
->references('id')
->on('roles')
->onDelete('cascade');
$table->primary(['permission_id', 'role_id']);
});
Schema::create('role_user', function (Blueprint $table) {
$table->integer('user_id')->unsigned();
$table->integer('role_id')->unsigned();
$table->foreign('role_id')
->references('id')
->on('roles')
->onDelete('cascade');
$table->foreign('user_id')
->references('id')
->on('users')
->onDelete('cascade');
$table->primary(['role_id', 'user_id']);
});
}
public function down()
{
Schema::drop('roles');
Schema::drop('permissions');
Schema::drop('permission_role');
Schema::drop('role_user');
}
上面的代码会创建角色表、权限表、角色与权限的中间表以及角色与用户的中间表。
2. 创建模型
接下来使用命令行分别创建角色与权限模型:
php artisan make:model Permission
php artisan make:model Role
然后分别打开Permission.php、Role.php 以及 User.php ,加入下面的代码:
// Permissions.php
public function roles()
{
return $this->belongsToMany(Role::class);
}
// Role.php
public function permissions()
{
return $this->belongsToMany(Permission::class);
}
//给角色添加权限
public function givePermissionTo($permission)
{
return $this->permissions()->save($permission);
}
// User.php
public function roles()
{
return $this->belongsToMany(Role::class);
}
// 判断用户是否具有某个角色
public function hasRole($role)
{
if (is_string($role)) {
return $this->roles->contains('name', $role);
}
return !! $role->intersect($this->roles)->count();
}
// 判断用户是否具有某权限
public function hasPermission($permission)
{
return $this->hasRole($permission->roles);
}
// 给用户分配角色
public function assignRole($role)
{
return $this->roles()->save(
Role::whereName($role)->firstOrFail()
);
}
上面的代码实现了给角色分配权限及给用户分配角色,然后还提供了判断用户是否具有某角色及某权限的方法。
之后就给使用Laravel提供的Authorization来定义权限控制了,打开 /app/Providers/AuthServiceProvider.php 文件,在 boot() 中添加代码:
public function boot(GateContract $gate)
{
parent::registerPolicies($gate);
$permissions = \App\Permission::with('roles')->get();
foreach ($permissions as $permission) {
$gate->define($permission->name, function($user) use ($permission) {
return $user->hasPermission($permission);
});
}
}
通过上面的方法就定义好了各个权限。下面就该填充数据了。
3. 填充数据
为方便起见,这里使用 tinker 命令行工具来添加几条测试数据:
之后进入命令行,依次输入下列命令:
// 改变命名空间位置,避免下面每次都要输入 App
namespace App
// 创建权限
$permission_edit = new Permission
$permission_edit->name = 'edit-post'
$permission_edit->label = 'Can edit post'
$permission_edit->save()
$permission_delete = new Permission
$permission_delete->name = 'delete-post'
$permission_delete->label = 'Can delete post'
$permission_delete->save()
// 创建角色
$role_editor = new Role
$role_editor->name = 'editor';
$role_editor->label = 'The editor of the site';
$role_editor->save()
$role_editor->givePermissionTo($permission_edit)
$role_admin = new Role
$role_admin->name = 'admin';
$role_admin->label = 'The admin of the site';
$role_admin->save()
// 给角色分配权限
$role_admin->givePermissionTo($permission_edit)
$role_admin->givePermissionTo($permission_delete)
// 创建用户
$editor = factory(User::class)->create()
// 给用户分配角色
$editor->assignRole($role_editor->name)
$admin = factory(User::class)->create()
$admin->assignRole($role_admin->name)
上面我们创建了两个权限:edit-post 和 delete-post,然后创建了 editor 和 admin 两个角色,editor 角色拥有 edit-post 的权限,而 admin 两个权限都有。之后生成了两个用户,分别给他们分配了 editor 和 admin 的角色,即:ID 1 用户拥有 editor 角色,因此只有 edit-post 权限,而 ID 2 用户拥有 admin 角色,因此具有 edit-post 和 delete-post 权限。下面我们来验证下是否正确。
打开 routes.php 文件:
Route::get('/', function () {
$user = Auth::loginUsingId(1);
return view('welcome');
})
上面我们先验证 ID 1 用户的权限,然后修改 /resources/views/welcome.blade.php 文件:
!DOCTYPE html>
html>
head>
title>Laravel/title>
/head>
body>
h1>权限测试/h1>
p>
@can('edit-post')
a href="#" rel="external nofollow" rel="external nofollow" >Edit Post/a>
@endcan
/p>
p>
@can('delete-post')
a href="#" rel="external nofollow" rel="external nofollow" >Delete Post/a>
@endcan
/p>
/body>
/html>
在视图中我们通过 Laravel 提供的 @can 方法来判断用户是否具有某权限。
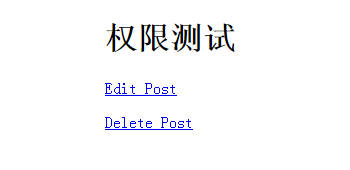
打开浏览器,访问上面定义的路由,可以看到视图中只出现了 Edit Post 链接。之后我们修改路由中用户ID为 2 ,然后再次刷新浏览器,可以看到,这次同时出现了 Edit Post 和 Delete Post 两个链接,说明我们定义的权限控制起作用了。
更多关于Laravel相关内容感兴趣的读者可查看本站专题:《Laravel框架入门与进阶教程》、《php优秀开发框架总结》、《php面向对象程序设计入门教程》、《php+mysql数据库操作入门教程》及《php常见数据库操作技巧汇总》
希望本文所述对大家基于Laravel框架的PHP程序设计有所帮助。
您可能感兴趣的文章:- 在Laravel5中正确设置文件权限的方法
- Laravel5权限管理方法详解
- Laravel框架实现的rbac权限管理操作示例
- laravel实现简单用户权限的示例代码
- 解决laravel中日志权限莫名变成了root的问题
- laravel利用中间件做防非法登录和权限控制示例
- Laravel5.1数据库连接、创建数据库、创建model及创建控制器的方法
- laravel5.1框架基础之Blade模板继承简单使用方法分析
- Laravel5.1框架注册中间件的三种场景详解
- laravel5.1框架基础之路由详解
- laravel5.1框架model类查询的实现方法


 咨 询 客 服