一、安装插件。
展示层前端框架以Bootstrap为主,因为Bootstrap的js功能较弱,这里添加一些插件作补充。其实很多js插件可以通过NuGet安装,只是NuGet安装时添加的内容较多,不如自己复制来的干净,所以这里所有的插件都是下载然后复制到项目中。
1、Bootstrap 3 Datepicker 4.17.37
网址:https://eonasdan.github.io/bootstrap-datetimepicker/
下载并解压压缩包->将bootstrap-datetimepicker.js和bootstrap-datetimepicker.min.js复制到Ninesy.Web项目的Scripts文件夹,将bootstrap-datetimepicker.css和bootstrap-datetimepicker.min.css复制到Content文件夹。
2、bootstrap-dialog 3.3.4.1
网址:https://github.com/nakupanda/bootstrap3-dialog
下载并解压压缩包->将.js复制到Ninesy.Web项目的Scripts文件夹,将.css复制到Content文件夹。
3、bootstrap-select 1.10.0
网址:http://silviomoreto.github.io/bootstrap-select/
下载并解压压缩包->将bootstrap-select.js复制到Ninesy.Web项目的Scripts文件夹,和defaults-zh_CN.js重命名为bootstrap-select-zh_CN.js复制到Ninesy.Web项目的Scripts文件夹,将bootstrap-select.css、bootstrap-select.css.map和bootstrap-select.min.css复制到Content文件夹。
4、bootstrap-table 1.10.1
网址:http://bootstrap-table.wenzhixin.net.cn/
下载并解压压缩包->将bootstrap-table.js和bootstrap-table-zh-CN.js复制到Ninesy.Web项目的Scripts文件夹,将bootstrap-table.css复制到Content文件夹。
5、Bootstrap TreeView 1.2.0
网址:https://github.com/jonmiles/bootstrap-treeview
下载并解压压缩包->将bootstrap-treeview.js复制到Ninesy.Web项目的Scripts文件夹,将bootstrap-treeview.css复制到Content文件夹。
6、twbs-pagination
网址:http://esimakin.github.io/twbs-pagination/
下载并解压压缩包->将jquery.twbsPagination.js和jquery.twbsPagination.min.js复制到Ninesy.Web项目的Scripts文件夹。
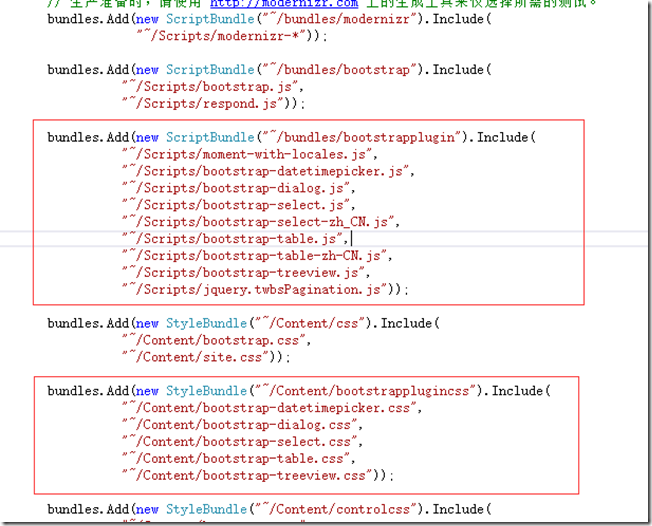
7、对js和css进行捆绑和压缩
打开Ninesky.Web->App_Start->BundleConfig.cs。添加红框内的代码。
二、获取ModelState错误信息的方法
在项目中有些内容是通过AJAX方法提交,如果提交时客户端没有进行验证,在服务器端进行验证时会将错误信息保存在ModelState中,这里需要写一个方法来获取ModelState的错误信息,以便反馈给客户端。
1、Ninesk.Web【右键】->添加->类,输入类名General。
引用命名空间using System.Web.Mvc和System.Text。
添加静态方法GetModelErrorString(),该方法用来获取模型的错误字符串。
using System.Linq;
using System.Text;
using System.Web.Mvc;

namespace Ninesky.Web
{
 /// summary>
 /// 通用类
 /// /summary>
 public class General
 {
 /// summary>
 /// 获取模型错误
 /// /summary>
 /// param name="modelState">模型状态/param>
 /// returns>/returns>
 public static string GetModelErrorString(ModelStateDictionary modelState)
 {
 StringBuilder _sb = new StringBuilder();
 var _ErrorModelState = modelState.Where(m => m.Value.Errors.Count() > 0);
 foreach(var item in _ErrorModelState)
 {
 foreach (var modelError in item.Value.Errors)
 {
 _sb.AppendLine(modelError.ErrorMessage);
 }
 }
 return _sb.ToString();
 }
 }
}
三、完善布局页
上次完成了管理员登录,这次要进行登录后的一些功能,要先把后台的布局页充实起来。
打开 Ninesky.Web/Areas/Control/Views/_Layout.cshtml。整成下面的代码。自己渣一样的美工,具体过程就不写了。
!DOCTYPE html>
html>
head>
 meta charset="utf-8" />
 meta name="viewport" content="width=device-width, initial-scale=1.0">
 title>@ViewBag.Title - 系统管理/title>
 @Styles.Render("~/Content//controlcss")
 @RenderSection("style", required: false)
 @Scripts.Render("~/bundles/modernizr")
 @Scripts.Render("~/bundles/jquery")
 @Scripts.Render("~/bundles/bootstrap")
 @RenderSection("scripts", required: false)
/head>
body>
 div class="navbar navbar-default navbar-fixed-top">
 div class="container">
 div class="navbar-header">
 button type="button" class="navbar-toggle" data-toggle="collapse" data-target=".navbar-collapse">
 span class="icon-bar">/span>
 span class="icon-bar">/span>
 span class="icon-bar">/span>
 /button>
 @Html.ActionLink("NINESKY 系统管理", "Index", "Home", new { area = "Control" }, new { @class = "navbar-brand" })
 /div>
 div class="navbar-collapse collapse">
 ul class="nav navbar-nav">
 li>a>span class="glyphicon glyphicon-user">/span> 用户管理/a>/li>
 li>a href="@Url.Action("Index","Admin")">span class='glyphicon glyphicon-lock'>/span> 管理员/a>/li>
 li>a>span class="glyphicon glyphicon-list">/span> 栏目设置/a>/li>
 li>a>span class="glyphicon glyphicon-cog">/span> 网站设置/a>/li>
 /ul>
 ul class="nav navbar-nav navbar-right">
 li>
 a href="@Url.Action("MyInfo","Admin")">span class="glyphicon glyphicon-envelope">/span> @Context.Session["Accounts"].ToString()/a>

 /li>
 li>
 a href="@Url.Action("Logout","Admin")">span class="glyphicon glyphicon-log-out">/span> 退出/a>
 /li>
 /ul>
 /div>
 /div>
 /div>

 div class="container body-content">
 div class="row">
 div class="col-lg-3 col-md-3 col-sm-4">@RenderSection("SideNav", false)/div>
 div class="col-lg-9 col-md-9 col-sm-8">@RenderBody()/div>
 /div>
 hr />
 footer class="navbar navbar-fixed-bottom text-center bg-primary ">
 p>copy; Ninesky v0.1 BASE BY 洞庭夕照 http://mzwhj.cnblogs.com/p>
 /footer>
 /div>
/body>
/html>
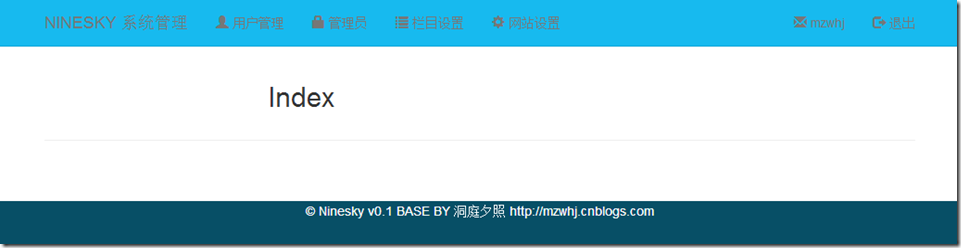
反正效果就是这个样子了。
三、功能实现
按照设想,要在Index界面完成管理员的浏览、添加和删除功能。这些功能采用ajax方式。
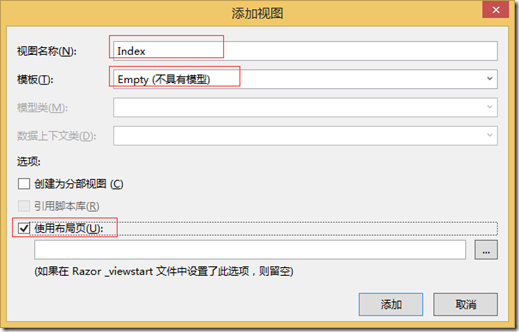
在添加AdminController的时候自动添加了Index()方法。
添加Index视图
在Index方法上右键添加视图
@{
 ViewBag.Title = "管理员";
}

ol class="breadcrumb">
 li>span class="glyphicon glyphicon-home">/span> @Html.ActionLink("首页", "Index", "Home")/li>
 li class="active">@Html.ActionLink("管理员", "Index", "Admin")/li>
/ol>

@section style{
 @Styles.Render("~/Content/bootstrapplugincss")
}

@section scripts{
 @Scripts.Render("~/bundles/jqueryval")
 @Scripts.Render("~/bundles/bootstrapplugin")

}
添加侧栏导航视图
Ninesky.Web/Areas/Control/Views/Admin【右键】->添加->视图
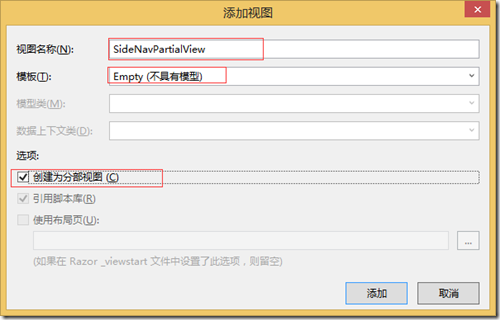
视图代码如下
div class="panel panel-default">
 div class="panel-heading">
 div class="panel-title">span class="glyphicon glyphicon-lock">/span> 管理员/div>
 /div>
 div class="panel-body">
 div class="list-group">
 div class="list-group-item">span class="glyphicon glyphicon-list">/span> @Html.ActionLink("管理","Index")/div>
 /div>
 /div>
/div>
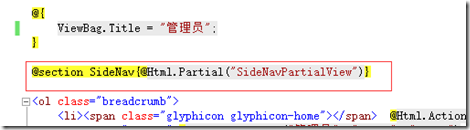
在Index视图中添加@section SideNav{@Html.Partial("SideNavPartialView")}(如图)
1、管理员列表
在Admin控制器中添加ListJson()方法
/// summary>
 /// 管理员列表
 /// /summary>
 /// returns>/returns>
 public JsonResult ListJson()
 {
 return Json(adminManager.FindList());
 }
为在index中使用bootstrap-table显示和操作管理员列表,在index视图中添加下图代码。
div id="toolbar" class="btn-group" role="group">
 button id="btn_add" class="btn btn-default">span class="glyphicon glyphicon-plus">/span> 添加/button>
 button id="btn_del" class="btn btn-default">span class="glyphicon glyphicon-remove">/span> 删除/button>
/div>
table id="admingrid">/table>
在@section scripts{ } 中添加js代码
script type="text/javascript">

 $(document).ready(function () {

 //表格
 var $table = $('#admingrid');
 $table.bootstrapTable({
 toolbar: "#toolbar",
 showRefresh: true,
 showColumns: true,
 showFooter: true,
 method: "post",
 url: "@Url.Action("ListJson")",
 columns: [
 { title: "state", checkbox: true },
 { title: "ID", field: "AdministratorID" },
 { title: "帐号", field: "Accounts" },
 { title: "登录时间", field: "LoginTime", formatter: function (value) { return moment(value).format("YYYY-MM-DD HH:mm:ss") } },
 { title: "登录IP", field: "LoginIP" },
 { title: "创建时间", field: "CreateTime", formatter: function (value) { return moment(value).format("YYYY-MM-DD HH:mm:ss") } },
 { title: "操作", field: "AdministratorID", formatter: function (value, row, index) { return "a href=\"javascript:void(0)\" onclick=\"ResetPassword(" + value + ",'" + row.Accounts + "')\">重置密码/a>" } }
 ]
 });
 //表格结束
 });
 /script>
}
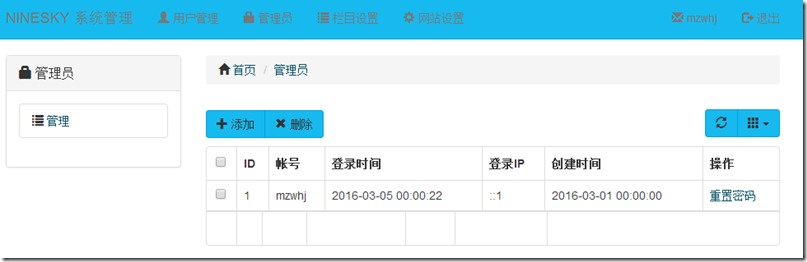
显示效果如图:
2、添加管理员
在控制器中添加AddPartialView()方法
/// summary>
 /// 添加【分部视图】
 /// /summary>
 /// returns>/returns>
 public PartialViewResult AddPartialView()
 {
 return PartialView();
 }
Models文件夹【右键】->添加->类,输入类名 AddAdminViewModel。
using System.ComponentModel.DataAnnotations;

namespace Ninesky.Web.Areas.Control.Models
{
 /// summary>
 /// 添加管理员模型
 /// /summary>
 public class AddAdminViewModel
 {
 /// summary>
 /// 帐号
 /// /summary>
 [Required(ErrorMessage = "必须输入{0}")]
 [StringLength(30, MinimumLength = 4, ErrorMessage = "{0}长度为{2}-{1}个字符")]
 [Display(Name = "帐号")]
 public string Accounts { get; set; }

 /// summary>
 /// 密码
 /// /summary>
 [DataType(DataType.Password)] [Required(ErrorMessage = "必须输入{0}")]
 [StringLength(20,MinimumLength =6, ErrorMessage = "{0}长度少于{1}个字符")]
 [Display(Name = "密码")]
 public string Password { get; set; }
 }
}
右键添加视图
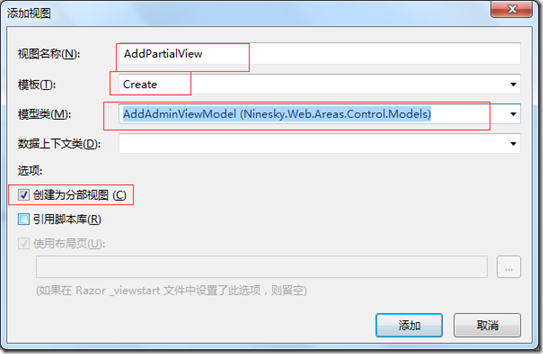
注意:抓图的时候忘记勾上引用脚本库了就抓了,记得勾上。
@model Ninesky.Web.Areas.Control.Models.AddAdminViewModel

@using (Html.BeginForm())
{
 @Html.AntiForgeryToken()

 div class="form-horizontal">
 @Html.ValidationSummary(true, "", new { @class = "text-danger" })
 div class="form-group">
 @Html.LabelFor(model => model.Accounts, htmlAttributes: new { @class = "control-label col-md-2" })
 div class="col-md-10">
 @Html.EditorFor(model => model.Accounts, new { htmlAttributes = new { @class = "form-control" } })
 @Html.ValidationMessageFor(model => model.Accounts, "", new { @class = "text-danger" })
 /div>
 /div>

 div class="form-group">
 @Html.LabelFor(model => model.Password, htmlAttributes: new { @class = "control-label col-md-2" })
 div class="col-md-10">
 @Html.EditorFor(model => model.Password, new { htmlAttributes = new { @class = "form-control" } })
 @Html.ValidationMessageFor(model => model.Password, "", new { @class = "text-danger" })
 /div>
 /div>

 /div>
}
@Scripts.Render("~/bundles/jqueryval")
在Index视图 script脚本区域,“//表格结束”后面添加js代码
//表格结束
//工具栏
//添加按钮
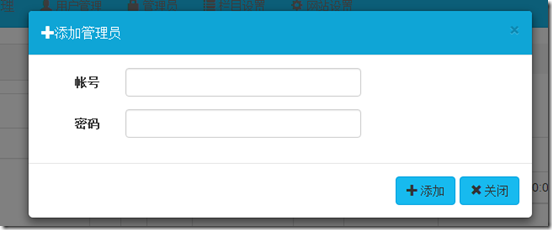
$("#btn_add").click(function () {
var addDialog = new BootstrapDialog({
title: "span class='glyphicon glyphicon-plus'>/span>添加管理员",
message: function (dialog) {
var $message = $('div>/div>');
var pageToLoad = dialog.getData('pageToLoad');
$message.load(pageToLoad);
return $message;
},
data: {
'pageToLoad': '@Url.Action("AddPartialView")'
},
buttons: [{
icon: "glyphicon glyphicon-plus",
label: "添加",
action: function (dialogItself) {
$.post($("form").attr("action"), $("form").serializeArray(), function (data) {
if (data.Code == 1) {
BootstrapDialog.show({
message: data.Message,
buttons: [{
icon: "glyphicon glyphicon-ok",
label: "确定",
action: function (dialogItself) {
$table.bootstrapTable("refresh");
dialogItself.close();
addDialog.close();
}
}]
});
}
else BootstrapDialog.alert(data.Message);
}, "json");
$("form").validate();
}
}, {
icon: "glyphicon glyphicon-remove",
label: "关闭",
action: function (dialogItself) {
dialogItself.close();
}
}]
});
addDialog.open();
});
//添加按钮结束
3、删除管理员
考虑到批量删除,上次写AdministratorManager没有写批量删除方法,这次补上。
打开Ninesky.Core/AdministratorManager.cs, 添加如下代码
/// summary>
 /// 删除【批量】返回值Code:1-成功,2-部分删除,0-失败
 /// /summary>
 /// param name="administratorIDList">/param>
 /// returns>/returns>
 public Response Delete(Listint> administratorIDList)
 {
 Response _resp = new Response();
 int _totalDel = administratorIDList.Count;
 int _totalAdmin = Count();
 foreach (int i in administratorIDList)
 {
 if (_totalAdmin > 1)
 {
 base.Repository.Delete(new Administrator() { AdministratorID = i }, false);
 _totalAdmin--;
 }
 else _resp.Message = "最少需保留1名管理员";
 }
 _resp.Data = base.Repository.Save();
 if(_resp.Data == _totalDel)
 {
 _resp.Code = 1;
 _resp.Message = "成功删除" + _resp.Data + "名管理员";
 }
 else if (_resp.Data > 0)
 {
 _resp.Code = 2;
 _resp.Message = "成功删除" + _resp.Data + "名管理员";
 }
 else
 {
 _resp.Code = 0;
 _resp.Message = "删除失败";
 }
 return _resp;
 }
另外要修改一下Ninesky.DataLibrary.Repository的删除public int Delete(T entity, bool isSave)代码将Remove方式 改为Attach,不然会出错。
/// summary>
 /// 删除实体
 /// /summary>
 /// param name="entity">实体/param>
 /// param name="isSave">是否立即保存/param>
 /// returns>在“isSave”为True时返回受影响的对象的数目,为False时直接返回0/returns>
 public int Delete(T entity, bool isSave)
 {
 DbContext.SetT>().Attach(entity);
 DbContext.EntryT>(entity).State = EntityState.Deleted;
 return isSave ? DbContext.SaveChanges() : 0;
 }
打开AdminController 添加DeleteJson(Listint> ids)方法
// summary>
 /// 删除
 /// Response.Code:1-成功,2-部分删除,0-失败
 /// Response.Data:删除的数量
 /// /summary>
 /// returns>/returns>
 [HttpPost]
 public JsonResult DeleteJson(Listint> ids)
 {
 int _total = ids.Count();
 Response _res = new Core.Types.Response();
 int _currentAdminID = int.Parse(Session["AdminID"].ToString());
 if (ids.Contains(_currentAdminID))
 {
 ids.Remove(_currentAdminID);
 }
 _res = adminManager.Delete(ids);
 if(_res.Code==1 _res.Data  _total)
 {
 _res.Code = 2;
 _res.Message = "共提交删除"+_total+"名管理员,实际删除"+_res.Data+"名管理员。\n原因:不能删除当前登录的账号";
 }
 else if(_res.Code ==2)
 {
 _res.Message = "共提交删除" + _total + "名管理员,实际删除" + _res.Data + "名管理员。";
 }
 return Json(_res);
 }
在Index视图 script脚本区域,“//添加按钮结束”后面添加删除js代码
//添加按钮结束

 //删除按钮
 $("#btn_del").click(function () {
 var selected = $table.bootstrapTable('getSelections');
 if ($(selected).length > 0) {
 BootstrapDialog.confirm("确定删除选中的" + $(selected).length + "位管理员", function (result) {
 if (result) {
 var ids = new Array($(selected).length);
 $.each(selected, function (index, value) {
 ids[index] = value.AdministratorID;
 });
 $.post("@Url.Action("DeleteJson","Admin")", { ids: ids }, function (data) {
 if (data.Code != 0) {
  BootstrapDialog.show({
  message: data.Message,
  buttons: [{
  icon: "glyphicon glyphicon-ok",
  label: "确定",
  action: function (dialogItself) {
  $table.bootstrapTable("refresh");
  dialogItself.close();
  }
  }]

  });
 }
 else BootstrapDialog.alert(data.Message);

 }, "json");
 }
 });
 }
 else BootstrapDialog.warning("请选择要删除的行");
 });
 //删除按钮结束
4、重置密码
在AdminController中 添加ResetPassword(int id)方法。方法中将密码重置为Ninesky。
/// summary>
 /// 重置密码【Ninesky】
 /// /summary>
 /// param name="id">管理员ID/param>
 /// returns>/returns>
 [HttpPost]
 public JsonResult ResetPassword(int id)
 {
 string _password = "Ninesky";
 Response _resp = adminManager.ChangePassword(id, Security.SHA256(_password));
 if (_resp.Code == 1) _resp.Message = "密码重置为:" + _password;
 return Json(_resp);
 }
在添加script代码中表格代码段可以看到,这里通过 连接的onclick调用ResetPassword方法,所以ResetPassword方法要放在表格生成前面,不然会出现 方法未定义的错误。

这里把代码放到$(document).ready的前面。
script type="text/javascript"> //重置密码
 function ResetPassword(id, accounts) {
 BootstrapDialog.confirm("确定重置" + accounts + "的密码", function (result) {
 if (result) {
 $.post("@Url.Action("ResetPassword", "Admin")", { id: id }, function (data) {
 BootstrapDialog.alert(data.Message);
 }, "json");
 }
 });
 };
 //重置密码结束

 $(document).ready(function () {

 //表格
5、修改管理员密码
在在AdminController中 添加MyInfo()方法。
/// summary>
 /// 我的资料
 /// /summary>
 /// returns>/returns>
 public ActionResult MyInfo()
 {
 return View(adminManager.Find(Session["Accounts"].ToString()));
 }
右键添加视图
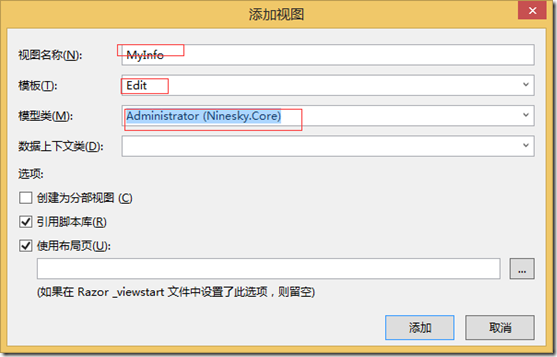
@model Ninesky.Core.Administrator

@{
 ViewBag.Title = "我的资料";
}

@section SideNav{@Html.Partial("SideNavPartialView")}

ol class="breadcrumb">
 li>span class="glyphicon glyphicon-home">/span> @Html.ActionLink("首页", "Index", "Home")/li>
 li>@Html.ActionLink("管理员", "Index", "Admin")/li>
 li class="active">我的资料/li>
/ol>
@Html.Raw(ViewBag.Message)
@using (Html.BeginForm())
{
 @Html.AntiForgeryToken()

 div class="form-horizontal">
 @Html.ValidationSummary(true, "", new { @class = "text-danger" })

 div class="form-group">
 @Html.LabelFor(model => model.Accounts, htmlAttributes: new { @class = "control-label col-md-2" })
 div class="col-md-10">
 @Html.DisplayTextFor(model => model.Accounts)

 /div>
 /div>

 div class="form-group">
 @Html.LabelFor(model => model.Password, htmlAttributes: new { @class = "control-label col-md-2" })
 div class="col-md-10">
 @Html.EditorFor(model => model.Password, new { htmlAttributes = new { @class = "form-control" } })
 @Html.ValidationMessageFor(model => model.Password, "", new { @class = "text-danger" })
 /div>
 /div>

 div class="form-group">
 @Html.LabelFor(model => model.LoginIP, htmlAttributes: new { @class = "control-label col-md-2" })
 div class="col-md-10">
 @Html.DisplayTextFor(model => model.LoginIP)

 /div>
 /div>

 div class="form-group">
 @Html.LabelFor(model => model.LoginTime, htmlAttributes: new { @class = "control-label col-md-2" })
 div class="col-md-10">
 @Html.DisplayTextFor(model => model.LoginTime)
 /div>
 /div>

 div class="form-group">
 @Html.LabelFor(model => model.CreateTime, htmlAttributes: new { @class = "control-label col-md-2" })
 div class="col-md-10">
 @Html.DisplayTextFor(model => model.CreateTime)
 /div>
 /div>

 div class="form-group">
 div class="col-md-offset-2 col-md-10">
 input type="submit" value="保存" class="btn btn-default" />
 /div>
 /div>
 /div>
}

@section Scripts {
 @Scripts.Render("~/bundles/jqueryval")
}
在在AdminController中 添加处理方法MyInfo(FormCollection form)方法。
[ValidateAntiForgeryToken]
 [HttpPost]
 public ActionResult MyInfo(FormCollection form)
 {
 var _admin = adminManager.Find(Session["Accounts"].ToString());

 if (_admin.Password != form["Password"])
 {
 _admin.Password = Security.SHA256(form["Password"]);
 var _resp = adminManager.ChangePassword(_admin.AdministratorID, _admin.Password);
 if(_resp.Code ==1) ViewBag.Message = "div class=\"alert alert-success\" role=\"alert\">span class=\"glyphicon glyphicon-ok\">/span>修改密码成功!/div>";
 else ViewBag.Message = "div class=\"alert alert-danger\" role=\"alert\">span class=\"glyphicon glyphicon-remove\">/span>修改密码失败!/div>";
 }
 return View(_admin);
 }
==========================================================
管理员功能到此写完。感慨一下:时间太少,熬夜到凌晨真不容易!
代码见:https://ninesky.codeplex.com/SourceControl/latest
代码下载:https://ninesky.codeplex.com 点击SOURCE CODE 点击Download下载源文件。
以上就是本文的全部内容,希望对大家的学习有所帮助,也希望大家多多支持脚本之家。
您可能感兴趣的文章:- ASP.NET MVC5网站开发用户修改资料和密码(六)
- Asp.NEt邮箱验证修改密码通过邮箱找回密码功能


 咨 询 客 服