开发到部署,亲力亲为
当我们开发一个单页面应用时,执行完构建后
会生成一个 index.html 在 dist 目录,那怎么把这个 index.html 部署到服务器上呢?
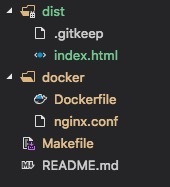
目录结构
- dist/:前端构建完的静态文件
- docker/:镜像所需的配置文件
配置 Nginx
挑几点配置讲讲,先是 Gzip 压缩资源,以节省带宽和提高浏览器加载速度
虽然 Webpack 已经支持在构建时就生成 .gz 压缩包,但也可以通过 Nginx 来启用
gzip on;
gzip_disable "msie6";
# 0-9 等级,级别越高,压缩包越小,但对服务器性能要求也高
gzip_comp_level 9;
gzip_min_length 100;
# Gzip 不支持压缩图片,我们只需要压缩前端资源
gzip_types text/css application/javascript;
再就是服务端口的配置,将 API 反向代理到后端服务
server {
 listen 8080;
 server_name www.frontend.com;

 root /usr/share/nginx/html/;

 location / {
 index index.html index.htm;
 try_files $uri $uri/ /index.html;
 # 禁止缓存 HTML,以保证引用最新的 CSS 和 JS 资源
 expires -1;
 }

 location /api/v1 {
 proxy_pass http://backend.com;
 }
}
完整配置长这样
worker_processes 1;

events { worker_connections 1024; }

http {
 ##
 # Basic Settings
 ##

 sendfile on;
 tcp_nopush on;
 tcp_nodelay on;
 keepalive_timeout 65;
 types_hash_max_size 2048;

 include /etc/nginx/mime.types;
 default_type application/octet-stream;

 ##
 # Logging Settings
 ##

 access_log /var/log/nginx/access.log;
 error_log /var/log/nginx/error.log;

 ##
 # Gzip Settings
 ##

 gzip on;
 gzip_disable "msie6";
 gzip_comp_level 9;
 gzip_min_length 100;
 gzip_types text/css application/javascript;

 server {
 listen 8080;
 server_name www.frontend.com;

 root /usr/share/nginx/html/;

 location / {
  index index.html index.htm;
  try_files $uri $uri/ /index.html;
  expires -1;
 }

 location /api/v1 {
  proxy_pass http://backend.com;
 }
 }
}
配置 Docker
这里简单一点,基于基础镜像,拷贝我们写好的 nginx.conf 和 index.html 到镜像内
FROM nginx:alpine

COPY nginx.conf /etc/nginx/nginx.conf
COPY dist /usr/share/nginx/html
编写 Makefile
完成了上面的准备,就可以编写命令来执行镜像的打包了
先给镜像取个名称和端口号
APP_NAME = spa_nginx_docker
PORT = 8080
通过 build 来打包镜像
build:
 cp docker/Dockerfile .
 cp docker/nginx.conf .
 docker build -t $(APP_NAME) .
 rm Dockerfile
 rm nginx.conf
通过 deploy 来启动镜像
deploy:
 docker run -d -it -p=$(PORT):$(PORT) --name="$(APP_NAME)" $(APP_NAME)
最后还有个 stop 来停止和清理镜像
stop:
 docker stop $(APP_NAME)
 docker rm $(APP_NAME)
 docker rmi $(APP_NAME)
完整配置长这样
APP_NAME = spa_nginx_docker
PORT = 8080

build:
 cp docker/Dockerfile .
 cp docker/nginx.conf .
 docker build -t $(APP_NAME) .
 rm Dockerfile
 rm nginx.conf

deploy:
 docker run -d -it -p=$(PORT):$(PORT) --name="$(APP_NAME)" $(APP_NAME)

stop:
 docker stop $(APP_NAME)
 docker rm $(APP_NAME)
 docker rmi $(APP_NAME)
完整命令长这样
# 静态资源构建
npm run build

# 镜像打包
make build

# 停止并删除旧镜像(首次可忽略)
make stop

# 镜像启动
make deploy
总结
目前的部署方法相对简单,后续会加入基础镜像和镜像仓库的使用,先去前面探探路


 咨 询 客 服