最近我们的小团队需要在服务器上共分出一个共享文件夹用于大家存放公共的资源文档, 大家想啊,这肯定很简单呀,在Windows下面只要创建相关的windows account,共享某个文件夹,把读/写权限给我们创建的account的,就完成了共享,但在Linux下面就没有这么美好了,网上查阅资源资料多指向通过Samba完成共享任务,但一些blog只介绍了怎么做,但没有为什么这么 做,搭建工作且不太顺利,对Linux算不上熟悉,走了很多弯路,所以通过这篇blog深入理解其中的每一步。
Samba的简介
Samba是在Linux和UNIX系统上实现SMB协议的一个免费软件,由服务器及客户端程序构成。这些是废话….. 来看点有意思的。作者Tridgwell申请使用SMBServer ( Server Message Block 的简写 ) 注册这个软件的商标, 因为SMB 是没有意义的文字而没有办法注册。然后他就翻字典,看到SAMBA一遍正好包含SMB几个字母 ,这这个词也是我们熟知的拉丁舞蹈的名称,然后就有了三八这个名字🙄。(自百科)
搭建Samba共享目录, 如果需要使用用户名/密码的形式访问共享目录,我们需要先创建Linux的user,然后通过smbpasswd创建samba用户(用户名需要一致),原文在这里:
To provide authentication on a standalone host, you have to create the accounts locally on the operating system and additionally in the Samba database. By default, Samba uses the tdbsam back end and stores the database in the /usr/local/samba/private/passdb.tdb file. Optionally set a different location in the smb.conf file using the passdb backend parameter. See the smb.conf 5 man page for details(from https://wiki.samba.org/index.php/Setting_up_Samba_as_a_Standalone_Server).
搭建需要用户名验证的共享目录
1. 创建共享目录的用户, 我们这里使用来组(group)来演示
groupadd smbgrp
useradd fielshare -s /sbin/nologin -g smbgrp -p <password>
#创建同名的smb用户, 这里的密码和local用户的密码是完全独立的,我们最后用的通过smbpasswd创建的用户
smbpasswd -a fielshare
2. 创建需要共享的工作目录,设置好文件夹的权限
mkdir -p /srv/samba/secure
chmod -R 0770 /srv/samba/secure
chown -R root:smbgrp /srv/samba/secure
搭建Samba共享目录, 如果需要使用用户名/密码的形式访问共享目录,我们需要先创建Linux的user,然后通过smbpasswd创建samba用户(用户名需要一致),原文在这里:
3. 修改安全上文
chcon -t samba_share_t /srv/samba/secure
这条命令是SELinux(详见Security-Enhanced Linux)下面的命令, 作用提把/srv/samba/securel切换到samba的上下文中。
4. 修改配置文件smb.conf
修改配置文件之前 ,我们先做好备份工作,以防不测。
cp /etc/samba/smb.conf /etc/samba/smb.conf.orig
在这里我们有以下事情需要做:
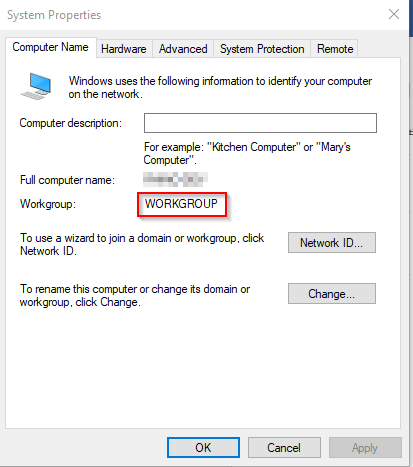
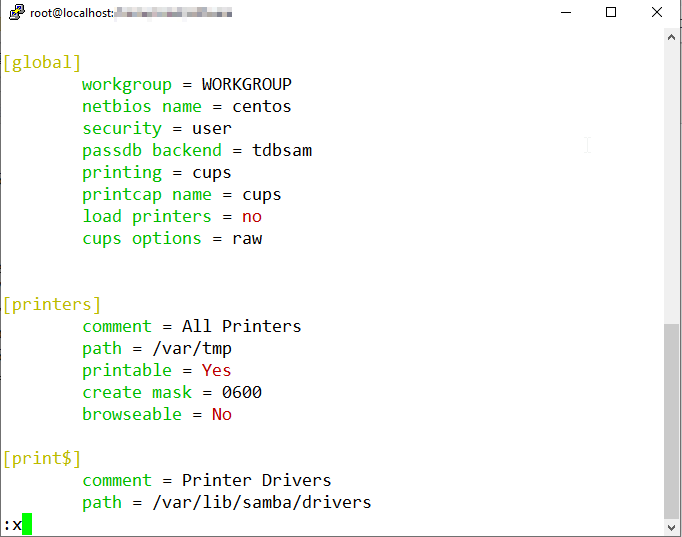
1.在[global] section下修改workgroup为WORKGROUP (就是我的电脑=>属性=> 计算机名看到的工作级的名字)

2.设置[global] 下的netbios name, 这个可以是任意,就是我们在我的芳邻下看到的计算机名称
3. 确定 [global] 下security设置为user
4.添加共享目录的配置
#为暴露在我的芳邻里点进去看到的文件夹名称
[share]
  comment = Secure File Server Share
  # 为需要共享的目录
  path = /srv/samba/secure
  # 可访问的用户,多用户用空格隔开, 以@开头为用户组
  valid users = @smbgrp
  # 关闭匿名访问,设置为no
  guest ok = no
  writable = yes
  browsable = yes
整个smb.conf文件如下:
# See smb.conf.example for a more detailed config file or
# read the smb.conf manpage.
# Run 'testparm' to verify the config is correct after
# you modified it.
[global]
  workgroup = WORKGROUP
  netbios name = centos
  security = user
  passdb backend = tdbsam
  printing = cups
  printcap name = cups
  load printers = no
  cups options = raw
[printers]
  comment = All Printers
  path = /var/tmp
  printable = Yes
  create mask = 0600
  browseable = No
[print$]
  comment = Printer Drivers
  path = /var/lib/samba/drivers
  write list = @printadmin root
  force group = @printadmin
  create mask = 0664
  directory mask = 0775
 [share]
  comment = secure file share
  path = /srv/samba/secure
  valid users = @smbgrp
  guest ok = no
  writable = yes
  browsable = yes
  browseable = yes
注意smb.conf默认会有[home]节点,如果不是不想得一个和用户名同名的文件夹,请删除它。
完成编辑, 保存配置文件,

执行testparm后会得到下面相似的结果,就是说配置文件没有问题
[root@localhost software]# testparm
Load smb config files from /etc/samba/smb.conf
rlimit_max: increasing rlimit_max (1024) to minimum Windows limit (16384)
Processing section "[printers]"
Processing section "[print$]"
Processing section "[share]"
Loaded services file OK.
Server role: ROLE_STANDALONE
Press enter to see a dump of your service definitions
# Global parameters
[global]
 load printers = No
 netbios name = CENTOS-SHARE
 printcap name = cups
 security = USER
 idmap config * : backend = tdb
 cups options = raw
[printers]
 browseable = No
 comment = All Printers
 create mask = 0600
 path = /var/tmp
 printable = Yes
[print$]
 comment = Printer Drivers
 create mask = 0664
 directory mask = 0775
 force group = @printadmin
 path = /var/lib/samba/drivers
 write list = @printadmin root
[share]
 comment = secure file share
 path = /home/share
 read only = No
 valid users = @smbgrp
[root@localhost software]#
5. 重启samba服务, 打开我的电脑进行测试
systemctl restart smb.service
systemctl restart nmb.service
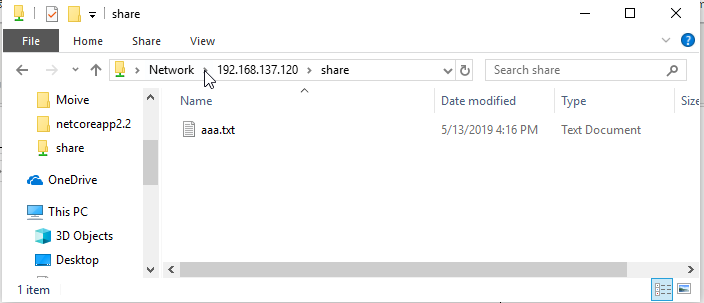
由于测试机和Linux主机不在同一个网络,我的芳邻里面找不到我配置的芳邻 CENTOS-SHARE, 这里我通过IP直接访问
6. 别忘了添加防火墙,不然你是看不到你的芳邻的
firewall-cmd --permanent --zone=public --add-service=samba
firewall-cmd --reload


总结
这里只演示了使用了用户名的验证模式来共享文件夹,主要是针对Windows的,对这一块不熟悉的同学可以自行尝试匿名共享。在设置过程中,我接触到以前没有接触到东西SELinux,这一块还是有很多的东西的。对于SAMBA的使用介绍网上有不少文章的,写这遍博客的目的也算是多个视角来告诉大家如何使用。
 咨 询 客 服