本实验在生产环境中现在已经用不到了,因为已经有更高级的自动化安装软件来取代了本次实验,所以只是为了能从低层更了解Linux的安装,从而做了本次实验,加深与理解当前所学的知识。
先看一下拓扑图吧!
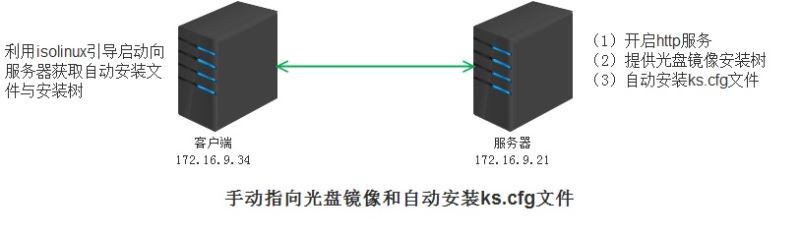
简单的解释一下拓扑图,先在服务器端开启http服务,在http默认目录下创建两个目录分别是ks、x86_64,并把光盘镜像挂载至/var/www/html/x86_64目录下,把已经制作好的ks.cfg文件复制至/var/www/html/ks目录中;在服务器端制作isolinux用于引导启动客户端(其实就是把光盘镜像中的isolinux目录给抽取出来,并重新用命令生成一个iso的文件)。在客户端在挂载isolinux,通过局域网进行安装CentOS 6.6 x86_64.
(1)首先制作ks.cfg文件
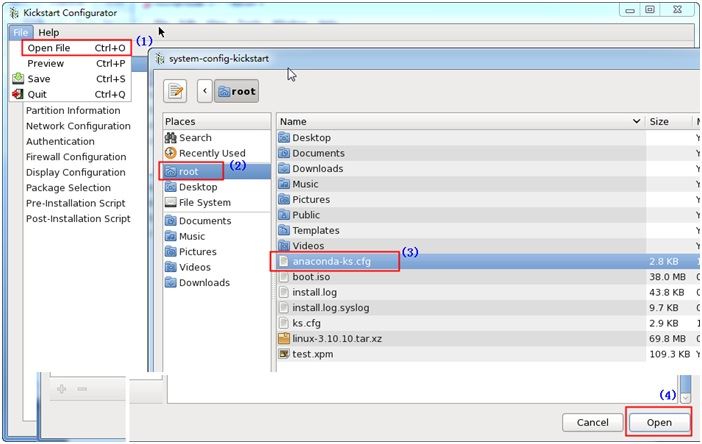
在CentOS 6安装完成后会在/root下生成一个anaconda-ks.cfg文件,这个是由CentOS 6安装程序anaconda根据你在系统安装过程中所有的键盘类型、语言、时区、分区、程序包的选择而生成的一个文件。
如果我们要制作一个anaconda-ks.cfg文件,可以参考这个文件在些基础上进行修改,可以使用system-config-kickstart程序生成相关的文件。
安装system-config-kickstart程序
[root@node-2 ~]# yum install -ysystem-config-kickstart
启动system-config-kickstart程序
使用xshell 4远程连接终端启动system-config-kickstart,建议安装XmanagerEnterprise 4软件,这样可以在本地终端中打开Linux系统中的软件。在命令行中输入system-config-kickstart命令即可。
修改完之后在File菜单中选择Save保存,在最上面输入ks.cfg名字,选择保存位置,点击Save按钮即可。
查看刚刚生成的文件并进行添加一些内容,因为有些命令是需要手动添加的,相关的请参考REHL官方的资料。
[root@node-2 ~]# cat /var/www/html/ks/ks.cfg
#platform=x86, AMD64, or IntelEM64T
#version=DEVEL
# Firewall configuration
firewall --disabled #安装后重启初始化系统时选择关防火墙
# Install OS instead of upgrade
install #安装类型选择为安装
# Use network installation
url --url="http://172.16.9.21/x86_64/" #通过网络安装,使用的Http服务
repo --name="CentOS"--baseurl=http://172.16.9.21/x86_64/ --cost=100
#repo --name="FedoraEPEL" --baseurl=http://172.16.0.1/fedora-epel/6/x86_64/ --cost=1000
# Root password
rootpw --iscrypted $1$jLn8z9P1$ff07gV9CfXmz1Q0NEOmAw/ #管理员root的密码,使用加密存放
# System authorizationinformation
auth --useshadow --passalgo=sha512 #认证方法,使用的sha512的加密方式
# Use graphical install
graphical #使用图形界面进行安装
firstboot --disable
# System keyboard
keyboard us #选择的键盘类型为us
# System language
lang en_US #语言为英文
# SELinux configuration
selinux --disabled #关闭selinux
# Do not configure the X WindowSystem
skipx #忽略X Window System的配置
# Installation logging level
logging --level=info #启动的级别为文本
# Reboot after installation
reboot #安装完之后重启系统
# System timezone
timezone Asia/Shanghai #系统时区为亚洲/上海
# Network information
#network --bootproto=dhcp --device=eth0 --onboot=on
# System bootloaderconfiguration #表示传递能内核的参数
bootloader--append="crashkernel=auto crashkernel=auto rhgb quiet"--location=mbr --driveorder="sda
# Partition clearinginformation
clearpart --all #以下都是对磁盘进行分区操作的,这里使用的LVM
zerombr #磁盘没有分区,对磁盘进行分区
part /boot --fstype=ext4--size=200
part pv.008002 --size=61440
volgroup vg0 --pesize=8192pv.008002
logvol / --fstype=ext4--name=root --vgname=vg0 --size=20480
logvol swap --name=swap--vgname=vg0 --size=2048
logvol /usr --fstype=ext4--name=usr --vgname=vg0 --size=10240
logvol /var --fstype=ext4--name=var --vgname=vg0 --size=20480
%post #安装完之后需要执行的脚本
%end #脚本结束符
%packages #在安装过程中需要安装的程序包及程序包组
@base
@basic-desktop
@chinese-support
@client-mgmt-tools
@core
@desktop-platform
@fonts
@general-desktop
@graphical-admin-tools
@legacy-x
@network-file-system-client
@perl-runtime
@remote-desktop-clients
@x11
-ibus-table-cangjie
-ibus-table-erbi
-ibus-table-wubi
%end #程序包及程序包组结束符
(2) 安装http服务与启动
[root@node-2 ~]# yum installhttpd -y #安装httpd服务
[root@node-2 ~]# service httpdstart #启动http服务
Starting httpd: [ OK ]
[root@node-2 ~]# netstat-ntlp|grep 80 #查看启动状态,http的端口为tcp的80端口
tcp 0 0 :::80 :::* LISTEN 2008/httpd
(3) 挂载光盘镜像
把光盘镜像放入光驱,如果使用的是虚拟机把光盘文件添加至虚拟机的光驱,并选择启用。
[root@node-2 ~]# mkdir /var/www/html/{ks,x86_64} #创建ks,x86_64目录
[root@node-2 ~]# mount -r/dev/dvd /var/www/html/x86_64/ #以只读方式挂载光盘镜像至/var/www/html/x86_64/
[root@node-2 ~]# mount|tail -1 #查看挂载情况
/dev/sr0 on/var/www/html/x86_64 type iso9660 (ro)
(4) 复制ks.cfg文件至/var/www/html/ks目录下
[root@node-2 ~]# cp/root/ks.cfg /var/www/html/ks/
[root@node-2 ~]# ls/var/www/html/ks/
ks.cfg
上一页12 下一页 阅读全文


 咨 询 客 服