我们知道,C++和python各有优缺点,C++可以直接映射到硬件底层,实现高效运行,而python能够方便地来进行编程,有助于工程的快速实现。
那能不能发挥两者的优势将它们结合起来?当然是可以的!有多种方法可以实现它们之间的相互转换。
链接文章中,有提到一个简单的例子,来教我们如何生成可以被python加载的文件。
但是这只能针对简单的数据进行封装,一旦涉及到自定义的类等封装数据,就需要借助第三方库来帮助更好实现。
比如numpy与C++的数据接口。
这里对python调用C++生成的pyd(so/dll)文件进行进一步的探索。
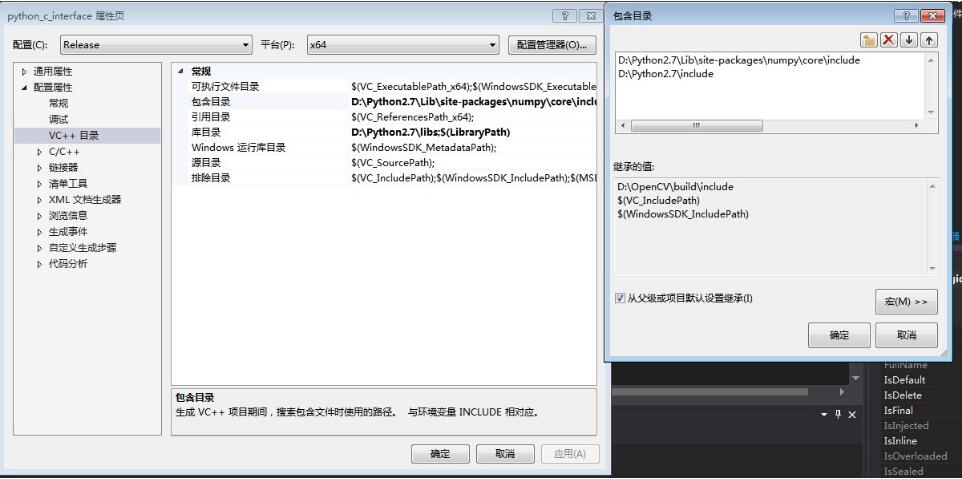
1.首先进行如下配置,在VC++目录中包含python和numpy的文件目录:

配置为Release平台,不然numpy的头文件无法被包含,导致编译器链接出错。
特别要注意的一点是用cmd生成pyd文件时,VS2013可能要输入: SET VS90COMNTOOLS=%VS120COMNTOOLS%(每次重新打开cmd窗口运行pythonsetup.py build的时候都要输入一次)才能生成成功。
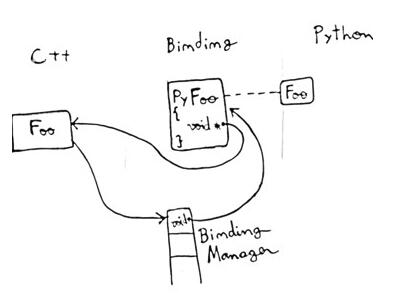
2.理解python调用C++的数据交互过程:

Python中的代码通过CPython等将语句解释为C/C++语言,然后编译器调用binding入口函数,将传进来的PyObject*参数通过PyFloat_AsDouble()等转换成C/C++变量。
这些作为输入变量传进已经写好的C++函数,调用该函数,返回C++结果。最后反过来,将C/C++变量转成CPython可以识别的PyObject*对象返回给python编译器(如函数PyFloat_FromDouble()),完成python到C++的调用。
当C/C++里面的输入变量或者返回值都不是基本类型时,比如自定义的类,那我们同样要按照类里面定义数据的方式以数据的方式来对应改成python能识别的基本类型的组合。
以Mat和numpy的array对象相互转换为例:
//以Mat的allocator作为基类,Numpy的Allocator作为继承类
//这样可以用派生对象指针对基类数据进行操作
class NumpyAllocator : public MatAllocator
{
public:
 NumpyAllocator() { stdAllocator = Mat::getStdAllocator(); }
 ~NumpyAllocator() {}

 UMatData* allocate(PyObject* o, int dims, const int* sizes, int type, size_t* step) const
 {
  UMatData* u = new UMatData(this);
  u->data = u->origdata = (uchar*)PyArray_DATA((PyArrayObject*) o);
  npy_intp* _strides = PyArray_STRIDES((PyArrayObject*) o);
  for( int i = 0; i  dims - 1; i++ )
   step[i] = (size_t)_strides[i];
  step[dims-1] = CV_ELEM_SIZE(type);
  u->size = sizes[0]*step[0];
  u->userdata = o;
  return u;
 }

 UMatData* allocate(int dims0, const int* sizes, int type, void* data, size_t* step, int flags, UMatUsageFlags usageFlags) const
 {
  if( data != 0 )
  {
   CV_Error(Error::StsAssert, "The data should normally be NULL!");
   // probably this is safe to do in such extreme case
   return stdAllocator->allocate(dims0, sizes, type, data, step, flags, usageFlags);
  }
 //确保当前使用python的C API是线程安全的
  PyEnsureGIL gil;

  int depth = CV_MAT_DEPTH(type);
  int cn = CV_MAT_CN(type);
  const int f = (int)(sizeof(size_t)/8);
  int typenum = depth == CV_8U ? NPY_UBYTE : depth == CV_8S ? NPY_BYTE :
  depth == CV_16U ? NPY_USHORT : depth == CV_16S ? NPY_SHORT :
  depth == CV_32S ? NPY_INT : depth == CV_32F ? NPY_FLOAT :
  depth == CV_64F ? NPY_DOUBLE : f*NPY_ULONGLONG + (f^1)*NPY_UINT;
  int i, dims = dims0;
  cv::AutoBuffernpy_intp> _sizes(dims + 1);
  for( i = 0; i  dims; i++ )
   _sizes[i] = sizes[i];
  if( cn > 1 )
   _sizes[dims++] = cn;
  PyObject* o = PyArray_SimpleNew(dims, _sizes, typenum);
  if(!o)
   CV_Error_(Error::StsError, ("The numpy array of typenum=%d, ndims=%d can not be created", typenum, dims));
  return allocate(o, dims0, sizes, type, step);
 }

 bool allocate(UMatData* u, int accessFlags, UMatUsageFlags usageFlags) const
 {
  return stdAllocator->allocate(u, accessFlags, usageFlags);
 }

 void deallocate(UMatData* u) const
 {
  if(!u)
   return;
  PyEnsureGIL gil;
  CV_Assert(u->urefcount >= 0);
  CV_Assert(u->refcount >= 0);
  if(u->refcount == 0)
  {
   PyObject* o = (PyObject*)u->userdata;
   Py_XDECREF(o);
   delete u;
  }
 }
 //基类指针,调用allocate函数进行内存分配
 const MatAllocator* stdAllocator;
};
上面是先构造好能够相互交互的allocator。
//将PyObject的特性幅值给size,ndims,type
 int typenum = PyArray_TYPE(oarr), new_typenum = typenum;
 int type = typenum == NPY_UBYTE ? CV_8U :
    typenum == NPY_BYTE ? CV_8S :
    typenum == NPY_USHORT ? CV_16U :
    typenum == NPY_SHORT ? CV_16S :
    typenum == NPY_INT ? CV_32S :
    typenum == NPY_INT32 ? CV_32S :
    typenum == NPY_FLOAT ? CV_32F :
    typenum == NPY_DOUBLE ? CV_64F : -1;

 //....

 int ndims = PyArray_NDIM(oarr);
 //....

 const npy_intp* _sizes = PyArray_DIMS(oarr);

 const npy_intp* _strides = PyArray_STRIDES(oarr);
 for ( int i = ndims - 1; i >= 0; --i )
 {
  size[i] = (int)_sizes[i];
  if ( size[i] > 1 )
  {
   step[i] = (size_t)_strides[i];
   default_step = step[i] * size[i];
  }
  else
  {
   step[i] = default_step;
   default_step *= size[i];
  }
 }
 //....

//这一步直接用PyObject初始化Mat m
 m = Mat(ndims, size, type, PyArray_DATA(oarr), step);
 m.u = g_numpyAllocator.allocate(o, ndims, size, type, step);
 m.addref();
上面是将PyObject对象转为Mat的部分代码,具体可以参考opencv的cv2.cpp文件:..\OpenCV\sources\modules\python\src2
//将Mat转换为PyObject*
template>
PyObject* pyopencv_from(const Mat m)
{
 if( !m.data )
  Py_RETURN_NONE;
 Mat temp, *p = (Mat*)m;
 //确保数据拷贝不会对原始数据m产生破坏
 if(!p->u || p->allocator != g_numpyAllocator)
 {
  temp.allocator = g_numpyAllocator;
  ERRWRAP2(m.copyTo(temp));
  p = temp;
 }
 //将Mat封装好的userdata指针转给Pyobject*
 PyObject* o = (PyObject*)p->u->userdata;
 //引用计数器加一
 Py_INCREF(o);
 return o;
}
3.不是所有C++的语法都能转为python可调用的pyd文件
一个很重要的知识点是,pyd文件跟dll文件非常相似,所以生成dll比较困难的C++代码同样难以生成pyd,C++跟python编译器各自编译特性的区别也会使得转换存在困难,比如C++的动态编译。
下面是可以进行相互转换的C++特性(可以用swig生成):
类;构造函数和析构函数;虚函数;(多重)公有继承;
静态函数;重载(包括大多数操作符重载);引用;
模板编程(特化和成员模板);命名空间;默认参数;智能指针。
下面是不能或者比较困难进行转换的C++特性:
嵌套类;特定操作符的重载比如new和delete。
以上为个人经验,希望能给大家一个参考,也希望大家多多支持脚本之家。如有错误或未考虑完全的地方,望不吝赐教。
您可能感兴趣的文章:- python中Task封装协程的知识点总结
- Python自动化测试PO模型封装过程详解
- Python面向对象封装继承和多态示例讲解
- Python如何实现Paramiko的二次封装
- 使用Python封装excel操作指南
- python excel和yaml文件的读取封装
- python 使用paramiko模块进行封装,远程操作linux主机的示例代码
- Python之根据输入参数计算结果案例讲解
 咨 询 客 服