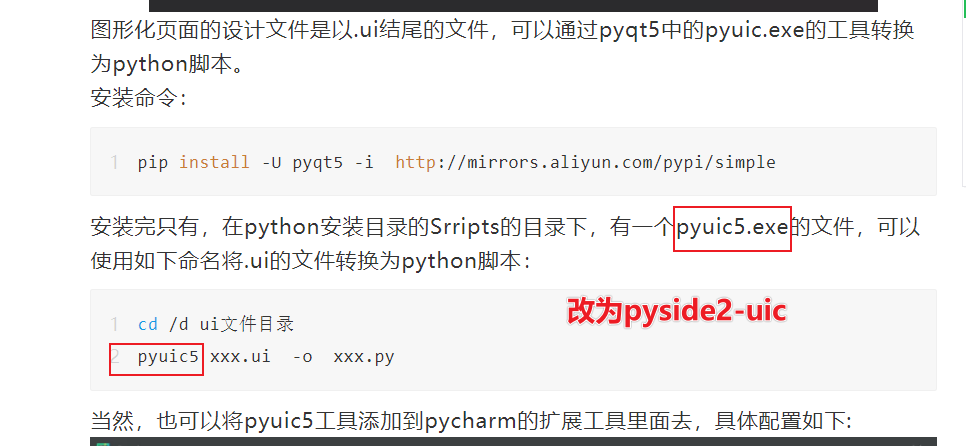
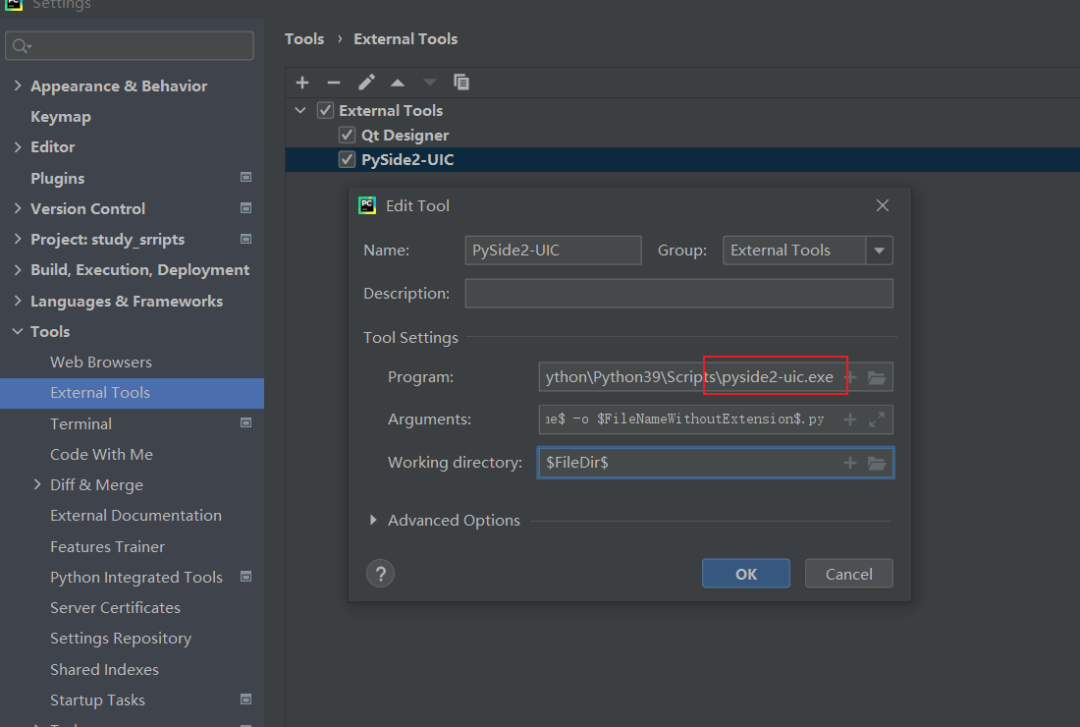
上一章节介绍了PySide2的安装以及如何去启动程序进行页面设计,并且将工具集成到pycharm的扩展工具中去,有2个地方写的不对,用的是pyuic工具,需要改一下,改成pyside2-uic.exe。具体改动点:
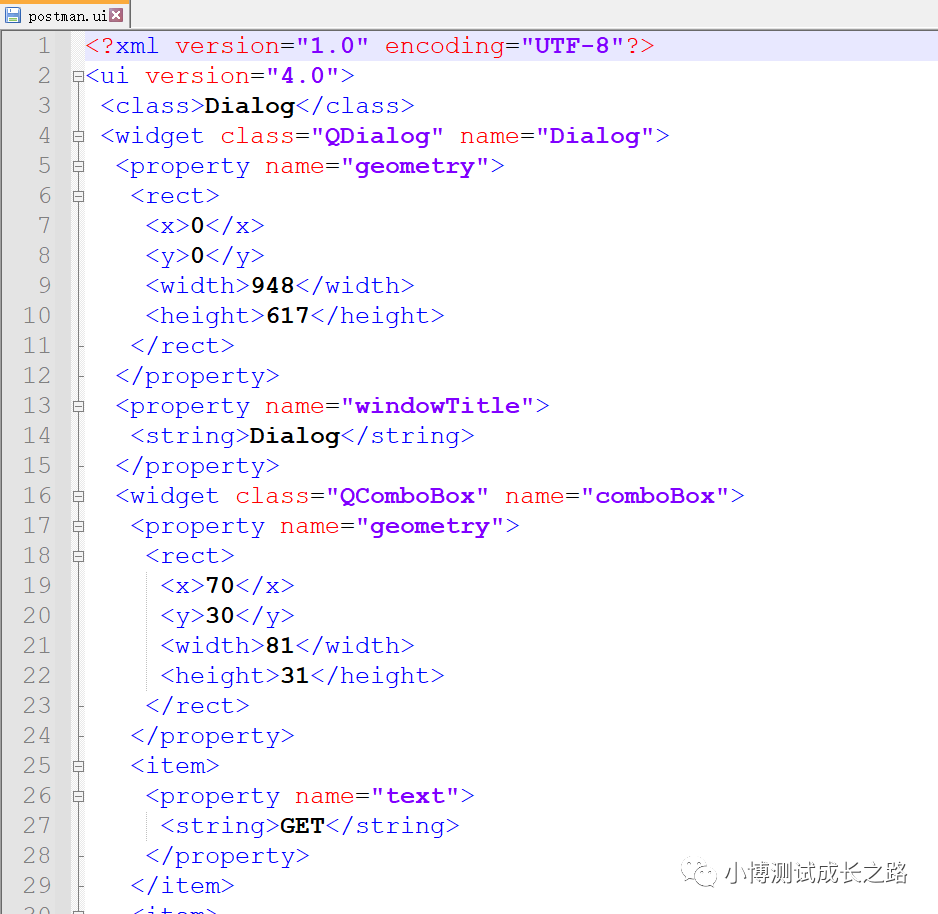
?xml version="1.0" encoding="UTF-8"?>
ui version="4.0">
 class>Dialog/class>
 widget class="QDialog" name="Dialog">
  property name="geometry">
   rect>
    x>0/x>
    y>0/y>
    width>948/width>
    height>617/height>
   /rect>
  /property>
  property name="windowTitle">
   string>Dialog/string>
  /property>
  widget class="QComboBox" name="comboBox">
   property name="geometry">
    rect>
     x>70/x>
     y>30/y>
     width>81/width>
     height>31/height>
    /rect>
   /property>
   item>
    property name="text">
     string>GET/string>
    /property>
   /item>
   item>
    property name="text">
     string>POST/string>
    /property>
   /item>
  /widget>
  widget class="QLineEdit" name="lineEdit">
   property name="geometry">
    rect>
     x>170/x>
     y>30/y>
     width>541/width>
     height>31/height>
    /rect>
   /property>
  /widget>
  widget class="QPushButton" name="pushButton">
   property name="geometry">
    rect>
     x>740/x>
     y>30/y>
     width>151/width>
     height>31/height>
    /rect>
   /property>
   property name="text">
    string>Send/string>
   /property>
  /widget>
  widget class="QLabel" name="label">
   property name="geometry">
    rect>
     x>70/x>
     y>90/y>
     width>72/width>
     height>15/height>
    /rect>
   /property>
   property name="text">
    string>Params/string>
   /property>
  /widget>
  widget class="QLabel" name="label_2">
   property name="geometry">
    rect>
     x>160/x>
     y>90/y>
     width>121/width>
     height>21/height>
    /rect>
   /property>
   property name="text">
    string>Headers/string>
   /property>
  /widget>
  widget class="QTextEdit" name="textEdit">
   property name="geometry">
    rect>
     x>70/x>
     y>150/y>
     width>821/width>
     height>331/height>
    /rect>
   /property>
  /widget>
 /widget>
 resources/>
 connections/>
/ui>
# -*- coding: utf-8 -*-


################################################################################
## Form generated from reading UI file 'postman.ui'
##
## Created by: Qt User Interface Compiler version 5.15.2
##
## WARNING! All changes made in this file will be lost when recompiling UI file!
################################################################################


from PySide2.QtCore import *
from PySide2.QtGui import *
from PySide2.QtWidgets import *


class Ui_Dialog(object):
    def setupUi(self, Dialog):
        if not Dialog.objectName():
            Dialog.setObjectName(u"Dialog")
        Dialog.resize(948, 617)
        self.comboBox = QComboBox(Dialog)
        self.comboBox.addItem("")
        self.comboBox.addItem("")
        self.comboBox.setObjectName(u"comboBox")
        self.comboBox.setGeometry(QRect(70, 30, 81, 31))
        self.lineEdit = QLineEdit(Dialog)
        self.lineEdit.setObjectName(u"lineEdit")
        self.lineEdit.setGeometry(QRect(170, 30, 541, 31))
        self.pushButton = QPushButton(Dialog)
        self.pushButton.setObjectName(u"pushButton")
        self.pushButton.setGeometry(QRect(740, 30, 151, 31))
        self.label = QLabel(Dialog)
        self.label.setObjectName(u"label")
        self.label.setGeometry(QRect(70, 90, 72, 15))
        self.label_2 = QLabel(Dialog)
        self.label_2.setObjectName(u"label_2")
        self.label_2.setGeometry(QRect(160, 90, 121, 21))
        self.textEdit = QTextEdit(Dialog)
        self.textEdit.setObjectName(u"textEdit")
        self.textEdit.setGeometry(QRect(70, 150, 821, 331))


        self.retranslateUi(Dialog)


        QMetaObject.connectSlotsByName(Dialog)
    # setupUi


    def retranslateUi(self, Dialog):
        Dialog.setWindowTitle(QCoreApplication.translate("Dialog", u"Dialog", None))
        self.comboBox.setItemText(0, QCoreApplication.translate("Dialog", u"GET", None))
        self.comboBox.setItemText(1, QCoreApplication.translate("Dialog", u"POST", None))


        self.pushButton.setText(QCoreApplication.translate("Dialog", u"Send", None))
        self.label.setText(QCoreApplication.translate("Dialog", u"Params", None))
        self.label_2.setText(QCoreApplication.translate("Dialog", u"Headers", None))
    # retranslateUi
import sys
from PySide2.QtWidgets import QApplication, QMainWindow
from postman import Ui_Dialog


if __name__ == "__main__":
    # 创建一个Application对象
    app = QApplication(sys.argv)
    # 创建一个窗体对象
    MainWindow = QMainWindow()

    ui = Ui_Dialog()
    ui.setupUi(MainWindow)
    # 设置窗口显示
    MainWindow.show()
    sys.exit(app.exec_())
到此这篇关于Python运行第一个PySide2的窗体程序的文章就介绍到这了,更多相关Python运行第一个PySide2的窗体程序内容请搜索脚本之家以前的文章或继续浏览下面的相关文章希望大家以后多多支持脚本之家!


 咨 询 客 服