前言
App自动化测试中有两个很重要的操作,屏幕滑动与绘制手势密码。目前很多App在启动时,都存在启动时的引导动画或者加载上下文内容时需要手动上滑或者下滑加载页面,所以在自动化测试的过程中模拟手的滑动操作看起来就很重要了;第二个比较重要的是模拟手动绘制九宫格完成手势密码的设置,这种手势密码在我了解的范围内,大多在金融类的app中最常见,还有一些对用户信息保密性较好的app中,所以,模拟绘制手势密码也是app自动化测试中必须掌握的操作,那么接下来我们就开始讲解两种操作该如何实现, 在进入正题之前,你还应该知道,手机中横纵坐标的原点是从屏幕的左上角顶点(0, 0)的位置开始的
滑动屏幕
swipe方法
模拟滑动屏幕的操作,我们通过swipe方法实现,先看一下这个方法的源代码
def swipe(self, start_x, start_y, end_x, end_y, duration=None):
  """Swipe from one point to another point, for an optional duration.
  Args:
   start_x (int): x-coordinate at which to start
   start_y (int): y-coordinate at which to start
   end_x (int): x-coordinate at which to stop
   end_y (int): y-coordinate at which to stop
   duration (:obj:`int`, optional): time to take the swipe, in ms.
  Usage:
   driver.swipe(100, 100, 100, 400)
  Returns:
   `WebElement`
  """
  # `swipe` is something like press-wait-move_to-release, which the server
  # will translate into the correct action
  action = TouchAction(self)
  action \

   .press(x=start_x, y=start_y) \

   .wait(ms=duration) \

   .move_to(x=end_x, y=end_y) \

   .release()
  action.perform()
  return self
参数
start_x, start_y : 表示开始滑动时的初始坐标,也就是从哪里开始滑动
end_x, end_y : 表示滑动后的坐标,也就是滑动到哪里
duration: : 表示滑动过程的时间间隔,模拟操作时,我们最好设置个时间间隔,避免由于代码运行太快,而真机或者模拟器反应比较慢,而操作失败,单位以毫秒计算
通过源码,我们发现swipe方法实际上是使用TouchAction实现的,这个类在后面我们仍然会使用,主要是模拟一些触屏动作
实现思路
大家可以想象一下,平时我们滑动屏幕时,是如何操作的?例如向左滑动屏幕,我们往往是把手放在屏幕的右侧,然后按住屏幕向左滑动,那么代码如何知道我们从屏幕的哪个位置开始讷?那就是坐标了,我们可以先获取屏幕的宽,高,然后按照它的比例计算鼠标的位置坐标,我这里取的起始坐标点为屏幕宽度的0.9倍,高度的0.5倍,大概就是我们实际中滑屏时手指的操作位置。大家可以根据下面播放的动画观察鼠标开始的大概位置和结束位置
接下来我们开始模拟动画中鼠标的操作(人手的操作,我用的模拟器所以有鼠标)
首先我们通过get_window_size()方法获取屏幕的宽和高(这个方法返回一个字典),然后计算鼠标的初始位置和结束为止
def get_phone_size(self):
  """获取屏幕的大小"""
  width = self.driver.get_window_size()['width'] # 获取屏幕的宽
  height = self.driver.get_window_size()['height'] # 获取屏幕的高
  return width, height
通过模拟动画不难看出,鼠标大概从起始点坐标(屏幕宽的3/4,高的1/2)位置滑动到结束点坐标(屏幕宽1/4,高1/2),ok,接下来通过swipe()方法实现滑动操作
def swipe_left(self, duration=300):
  """左滑"""
  width, height = self.get_phone_size
     start = width * 0.9, height * 0.5
  end = width * 0.1, height * 0.5
  return self.driver.swipe(*start, *end, duration)
 def swipe_right(self, duration=300):
  """右滑"""
  width, height = self.get_phone_size
  start = width * 0.9, height * 0.5
  end = width * 0.1, height * 0.5
  return self.driver.swipe(*start, *end, duration)
 def swipe_up(self, duration):
  """上滑"""
  width, height = self.get_phone_size
  start = width * 0.9, height * 0.5
  end = width * 0.1, height * 0.5
  return self.driver.swipe(*start, *end, duration)
 def swipe_down(self, duration):
  """下滑"""
  width, height = self.get_phone_size
  start = width * 0.9, height * 0.5
  end = width * 0.1, height * 0.5
  return self.driver.swipe(*start, *end, duration)
方法优化
以上每一个方法调用一次只能滑动一次,而且不同的滑动方向需要调用不同的方法,使用时比较麻烦。所以我们可以优化一下代码,通过调用一个函数实现不同次数,不同方向的滑动
使用for循环实现连续的滑动,引入direction参数,结合字典及反射机制,实现根据不同的参数执行不同滑动方向的方法,传递num参数控制滑动的次数,具体代码如下
def skip_welcome_page(self, direction, num=3):
  """
  滑动页面跳过引导动画
  :param direction: str 滑动方向,left, right, up, down
  :param num: 滑动次数
  :return:
  """
  direction_dic = {
   "left": "swipe_left",
   "right": "swipe_right",
   "up": "swipe_up",
   "down": "swipe_down"
  }
  time.sleep(3)
  if hasattr(self, direction_dic[direction]):
   for _ in range(num):
    getattr(self, direction_dic[direction])() # 使用反射执行不同的滑动方法
  else:
   raise ValueError("参数{}不存在, direction可以为{}任意一个字符串".
        format(direction, direction_dic.keys()))
以上就是所有滑动屏幕的操作了,具体效果,我们后面再看(你也可以先试试)
手势密码
TouchAction类
模拟手势密码的绘制我们使用TouchAction类,这个类提供了短按压press()方法,wait()方法,move_to()方法,release()方法,perform()方法等常用方法,下面我简单说明一下这几个方法的作用
press(element, x, y) : 其中element参数是一个元素对象,当element不为空时,x和y必须位None,如果element为None时,x如果不为None,那么y也不能位None,也就是说在安卓操作系统中,element和(x,y)必要传递一个,苹果系统可以不传,这里不做介绍
wait(duration) : duration是时间,以毫秒为单位,这个方法的作用是等待一段时间,和sleep的作用类似,唯一区别sleep不能被TouchAtion对象访问
release() : 这个方法的作用是结合press等按压动作使用的,表示抬起动作
perform():这个方法的作用是使所有的按压及等待,release等动作生效
实现思路
模拟大多app中的手势设置密码操作会遇见两种情况,一种是9宫格中每一个点的元素都可以通过定位表达式定位到,另一种是每个点无法通过定位表达式定位到的,只能定位到整体9宫格元素,每个点只能通过获取坐标的方式定位,那么我们今天模拟绘制手势密码的情况就是第二种,如果这种掌握了,那么第一种更简单,下面我们分析一下该如何获取每一个点的坐标,先来看下面的图
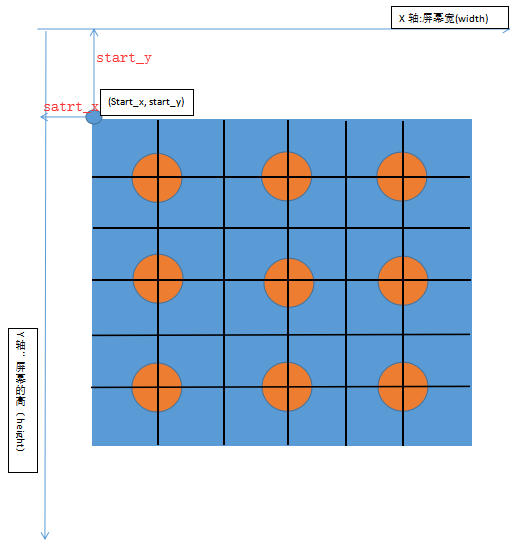
上图中的x轴,y轴是手机的坐标表示方式,请区别数学中的二维坐标,其中x轴方向表示手机屏幕的宽度width,y轴方向表示屏幕的高度height,原点为(0, 0); 蓝色方框代表9宫格手势操作的整体元素(内部包含9个点),start_x, start_y 代表9宫格元素的起始坐标点,start_x也是9宫格起始点距离y轴的距离,start_y也是9宫格起始点距离x轴的距离,请大家一定理解这几个值的关系,下面我们可以通过WebElement对象的rect方法获取9宫格元素的宽,高及起始点坐标
def get_element_size_location(element):
  width = element.rect["width"] # 9宫格元素的宽度
  height = element.rect["height"] # 9宫格坐标的高度
  # 9宫格元素的起始坐标点
  start_x = element.rect["x"]
  start_y = element.rect["y"]
  return width, height, start_x, start_y
除了使用rect方法外,你还可以使用location和size方法分别获取元素的起始点坐标和宽,高,两个方法同样返回字典
element.location ->{"x": start_x, "y": start_y}
element.size ->{"width": width, "height": height}
接下来我们通过9宫格元素的width,height,start_x, start_y分别计算每个点的坐标, 我们按照上图,把9宫格元素的width和height分别等分为6等分
前3个点(1, 2, 3)的坐标分别是
width, height, start_x, start_y = self.get_element_size_location(element)
point_1 = {"x": int(start_x + width * (1 / 6) * 1), "y": int(start_y + height * (1 / 6) * 1)}
point_2 = {"x": int(start_x + width * (1 / 6) * 3), "y": int(start_y + height * (1 / 6) * 1)}
point_3 = {"x": int(start_x + width * (1 / 6) * 5), "y": int(start_y + height * (1 / 6) * 1)}
中间3个点(4, 5, 6)的坐标分别为
point_4 = {"x": int(start_x + width * (1 / 6) * 1), "y": int(start_y + height * (1 / 6) * 3)}
point_5 = {"x": int(start_x + width * (1 / 6) * 3), "y": int(start_y + height * (1 / 6) * 3)}
point_6 = {"x": int(start_x + width * (1 / 6) * 5), "y": int(start_y + height * (1 / 6) * 3)}
最后3个点(7, 8, 9)的坐标分别为
point_7 = {"x": int(start_x + width * (1 / 6) * 1), "y": int(start_y + height * (1 / 6) * 5)}
point_8 = {"x": int(start_x + width * (1 / 6) * 3), "y": int(start_y + height * (1 / 6) * 5)}
point_9 = {"x": int(start_x + width * (1 / 6) * 5), "y": int(start_y + height * (1 / 6) * 5)}
下面我们使用TouchAction类中的move_to,wait,release,perform方法实现从一个点移动到另一个点,进而实现模拟手势密码的连线操作(链接1-2-3-6-9)
TouchAction(driver).press(x=point_1["x"], y=point_1["y"]).wait(300)\

 .move_to(x=point_2["x"], y=point_2["y"]).wait(500)\

 .move_to(x=point_3["x"], y=point_3["y"]).wait(500)\

 .move_to(x=point_6["x"], y=point_6["y"]).wait(500)\

 .move_to(x=point_9["x"], y=point_9["y"]).wait(500).release().perform()
完整代码
不包含滑动屏幕的代码
base.py
"""
------------------------------------
@Time : 2019/8/6 20:22
@Auth : linux超
@File : base.py
@IDE : PyCharm
@Motto: Real warriors,dare to face the bleak warning,dare to face the incisive error!
@QQ : 28174043@qq.com
@GROUP: 878565760
------------------------------------
"""
from appium.webdriver import WebElement
from appium.webdriver.common.touch_action import TouchAction
from appium.webdriver.webdriver import WebDriver
from selenium.webdriver.support.wait import WebDriverWait
from selenium.common.exceptions import NoSuchElementException, TimeoutException
class Base(object):
 def __init__(self, driver: WebDriver):
  self.driver = driver
 @staticmethod
 def get_element_size_location(element):
  width = element.rect["width"]
  height = element.rect["height"]
  start_x = element.rect["x"]
  start_y = element.rect["y"]
  return width, height, start_x, start_y
 def gesture_password(self, element: WebElement):
  width, height, start_x, start_y = self.get_element_size_location(element)
  point_1 = {"x": int(start_x + width * (1 / 6) * 1), "y": int(start_y + height * (1 / 6) * 1)}
  point_2 = {"x": int(start_x + width * (1 / 6) * 3), "y": int(start_y + height * (1 / 6) * 1)}
  point_3 = {"x": int(start_x + width * (1 / 6) * 5), "y": int(start_y + height * (1 / 6) * 1)}
  point_4 = {"x": int(start_x + width * (1 / 6) * 1), "y": int(start_y + height * (1 / 6) * 3)}
  point_5 = {"x": int(start_x + width * (1 / 6) * 3), "y": int(start_y + height * (1 / 6) * 3)}
  point_6 = {"x": int(start_x + width * (1 / 6) * 5), "y": int(start_y + height * (1 / 6) * 3)}
  point_7 = {"x": int(start_x + width * (1 / 6) * 1), "y": int(start_y + height * (1 / 6) * 5)}
  point_8 = {"x": int(start_x + width * (1 / 6) * 3), "y": int(start_y + height * (1 / 6) * 5)}
  point_9 = {"x": int(start_x + width * (1 / 6) * 5), "y": int(start_y + height * (1 / 6) * 5)}
  TouchAction(self.driver).press(x=point_1["x"], y=point_1["y"]).wait(300) \

   .move_to(x=point_2["x"], y=point_2["y"]).wait(500) \

   .move_to(x=point_3["x"], y=point_3["y"]).wait(500) \

   .move_to(x=point_6["x"], y=point_6["y"]).wait(500) \

   .move_to(x=point_9["x"], y=point_9["y"]).wait(500).release().perform()
 def find_element(self, locator: tuple, timeout=30) -> WebElement:
  wait = WebDriverWait(self.driver, timeout)
  try:
   element = wait.until(lambda driver: driver.find_element(*locator))
   return element
  except (NoSuchElementException, TimeoutException):
   print('no found element {} by {}', format(locator[1], locator[0]))
if __name__ == '__main__':
 pass
测试代码
test_gesture_password.py

import time
import unittest
from appium import webdriver
from appium.webdriver.common.mobileby import MobileBy
from base import Base
class TestGesture(unittest.TestCase):
 def setUp(self):
  desired = {
   "automationName": "uiautomator1",
   "platformName": "Android",
   "platformVersion": '5.1.1',
   "deviceName": "127.0.0.1:62001",
   "appPackage": "com.xxzb.fenwoo",
   "appActivity": "com.xxzb.fenwoo.activity.addition.WelcomeActivity",
   "app": r"D:\AppAutoTest\appPackage\Future-release-2018.apk",
   "unicodeKeyboard": True, # 屏蔽键盘
   "resetKeyboard": True
  }
  self.driver = webdriver.Remote(command_executor="http://127.0.0.1:4723/wd/hub",
          desired_capabilities=desired)
  self.base = Base(self.driver)
 def test_gesture_password(self):
  # 直接切换到手势密码页面
  self.driver.start_activity(app_package="com.xxzb.fenwoo",
         app_activity=".activity.user.CreateGesturePwdActivity")
  commit_btn = (MobileBy.ID, 'com.xxzb.fenwoo:id/right_btn')
  password_gesture = (MobileBy.ID, 'com.xxzb.fenwoo:id/gesturepwd_create_lockview')
  element_commit = self.base.find_element(commit_btn)
  element_commit.click()
  # 9宫格元素
  password_element = self.base.find_element(password_gesture)
  self.base.gesture_password(password_element)
  time.sleep(5) # 为了看效果
 def tearDown(self):
  self.driver.quit()
if __name__ == '__main__':
 unittest.main()
以上就是完整的模拟手势密码操作的代码, 但是问题来了 , 我这里执行的时候不成功,很尴尬,但是我确实看到过别人通过这种获取每个点的坐标,从一个点的坐标移动到另一个点的坐标的方式成功画线了,当然你可以先试试能不能成功再往下看!
方法重写
如果上边的方式你也不成功,那么就试试下面的方法吧,原理是一样的,主要不同点在,move_to方法传递的不是每个点的坐标,而是相对点的坐标,也就是从一个点移动到另一个点的距离坐标,例如点1的坐标为(360, 579), 点2的坐标为(580, 579), 那么移动的距离应该是横向220,纵向为0, 传递的参数应该是这样的move_to(x=220, y=0)(这里传递的参数叫做相对位置坐标,但是move_to的源码就是按照我之前的写法传参的,具体为啥,我也不得而知了),修改部分代码如下
TouchAction(self.driver).press(x=point_1["x"], y=point_1["y"]).wait(300) \

 .move_to(x=point_2["x"]-point_1["x"], y=point_2["y"]-point_1["y"]).wait(500) \

 .move_to(x=point_3["x"]-point_2["x"], y=point_3["y"]-point_2["y"]).wait(500) \

 .move_to(x=point_6["x"]-point_3["x"], y=point_6["y"]-point_3["y"]).wait(500) \

 .move_to(x=point_9["x"]-point_6["x"], y=point_9["y"]-point_6["y"]).wait(500).release().perform()
相对坐标的计算方法:用后一个目标点坐标减去前一个点的坐标即为相对坐标,你可以把这个段代码替换一下,你会发现确实成功了
代码优化
上述代码你会发现, 每次绘制的只能是同一个密码,如果我想绘制不同的密码,那么就必须修改绘制时传递的坐标,作为一枚优秀的程序员怎么可以这样讷?冲这句话,我就必须得想办法做到绘制任何密码组合的情况。我的需求是,当我给绘制函数getsture_password()传递不同密码时(例如这样的方式getsture_password(1, 2, 3, 6, 9))那么程序应该帮我把1-2-3-6-9链接起来,所以我想到了使用字典,把每个数字分别对应每一个坐标点,像下面这样
def get_password_location(self, element: WebElement) -> dict:
 width, height, start_x, start_y = self.get_element_size_location(element)
 point_1 = {"x": int(start_x + width * (1 / 6) * 1), "y": int(start_y + height * (1 / 6) * 1)}
 point_2 = {"x": int(start_x + width * (1 / 6) * 3), "y": int(start_y + height * (1 / 6) * 1)}
 point_3 = {"x": int(start_x + width * (1 / 6) * 5), "y": int(start_y + height * (1 / 6) * 1)}
 point_4 = {"x": int(start_x + width * (1 / 6) * 1), "y": int(start_y + height * (1 / 6) * 3)}
 point_5 = {"x": int(start_x + width * (1 / 6) * 3), "y": int(start_y + height * (1 / 6) * 3)}
 point_6 = {"x": int(start_x + width * (1 / 6) * 5), "y": int(start_y + height * (1 / 6) * 3)}
 point_7 = {"x": int(start_x + width * (1 / 6) * 1), "y": int(start_y + height * (1 / 6) * 5)}
 point_8 = {"x": int(start_x + width * (1 / 6) * 3), "y": int(start_y + height * (1 / 6) * 5)}
 point_9 = {"x": int(start_x + width * (1 / 6) * 5), "y": int(start_y + height * (1 / 6) * 5)}
 keys = {
  1: point_1,
  2: point_2,
  3: point_3,
  4: point_4,
  5: point_5,
  6: point_6,
  7: point_7,
  8: point_8,
  9: point_9
 }
 return keys
然后我通过另一个方法来实现绘制连线的功能
def gesture_password(self, element: WebElement, *pwd): # pwd是个元组,pwd[0]表示第一个密码
 """手势密码: 直接输入需要链接的点对应的数字,最多9位
 pwd: 传你想连接的点构成的密码,如:1, 2, 3, 6, 9
 """
 if len(pwd) > 9:
  raise ValueError("需要设置的密码不能超过9位!")
 keys_dict = self.get_password_location(element) # 9个点的坐标组成的字典
 start_point = "TouchAction(self.driver).press(x={0}, y={1}).wait(200)".\ # keys_dict[pwd[0]] 得到第一位密码数字对应的坐标的字典
  format(keys_dict[pwd[0]]["x"], keys_dict[pwd[0]]["y"]) # 起始点的坐标
 for index in range(len(pwd)-1): # 0,1,2,3
  follow_point = ".move_to(x={0}, y={1}).wait(200)".\

   format(keys_dict[pwd[index+1]]["x"] - keys_dict[pwd[index]]["x"],
     keys_dict[pwd[index+1]]["y"] - keys_dict[pwd[index]]["y"]) # 后续的点坐标
  start_point = start_point + follow_point # 把起始点的表达式和后续链接的点表达式链接在一起组成一个模拟连线的完整过程
 full_point = start_point + ".release().perform()" # 完整的过程通过.release().perform()使其生效
 return eval(full_point) # 执行一串表达式
比较难理解的地方,我已经详细注释了,当然,你可以复制我的代码先验证能否绘制成功再分析代码的实现原理
所有代码
修改后的绘制手势密码代码滑屏代码
"""
------------------------------------
@Time : 2019/8/6 20:45
@Auth : linux超
@File : base.py
@IDE : PyCharm
@Motto: Real warriors,dare to face the bleak warning,dare to face the incisive error!
@QQ  : 28174043@qq.com
@GROUP: 878565760
------------------------------------
"""
import time
from appium.webdriver import WebElement
from appium.webdriver.common.touch_action import TouchAction
from appium.webdriver.webdriver import WebDriver
from selenium.webdriver.support.wait import WebDriverWait
from selenium.common.exceptions import NoSuchElementException, TimeoutException
class Base(object):
  def __init__(self, driver: WebDriver):
    self.driver = driver
  @property
  def get_phone_size(self):
    """获取屏幕的大小"""
    width = self.driver.get_window_size()['width']
    height = self.driver.get_window_size()['height']
    return width, height
  def swipe_left(self, duration=300):
    """左滑"""
    width, height = self.get_phone_size
    start = width * 0.9, height * 0.5
    end = width * 0.1, height * 0.5
    return self.driver.swipe(*start, *end, duration)
  def swipe_right(self, duration=300):
    """右滑"""
    width, height = self.get_phone_size
    start = width * 0.1, height * 0.5
    end = width * 0.9, height * 0.5
    return self.driver.swipe(*start, *end, duration)
  def swipe_up(self, duration):
    """上滑"""
    width, height = self.get_phone_size
    start = width * 0.5, height * 0.9
    end = width * 0.5, height * 0.1
    return self.driver.swipe(*start, *end, duration)
  def swipe_down(self, duration):
    """下滑"""
    width, height = self.get_phone_size
    start = width * 0.5, height * 0.1
    end = width * 0.5, height * 0.9
    return self.driver.swipe(*start, *end, duration)
  def skip_welcome_page(self, direction, num=3):
    """
    滑动页面跳过引导动画
    :param direction: str 滑动方向,left, right, up, down
    :param num: 滑动次数
    :return:
    """
    direction_dic = {
      "left": "swipe_left",
      "right": "swipe_right",
      "up": "swipe_up",
      "down": "swipe_down"
    }
    time.sleep(3)
    if hasattr(self, direction_dic[direction]):
      for _ in range(num):
        getattr(self, direction_dic[direction])() # 使用反射执行不同的滑动方法
    else:
      raise ValueError("参数{}不存在, direction可以为{}任意一个字符串".
               format(direction, direction_dic.keys()))
  @staticmethod
  def get_element_size_location(element):
    width = element.rect["width"]
    height = element.rect["height"]
    start_x = element.rect["x"]
    start_y = element.rect["y"]
    return width, height, start_x, start_y
  def get_password_location(self, element: WebElement) -> dict:
    width, height, start_x, start_y = self.get_element_size_location(element)
    point_1 = {"x": int(start_x + width * (1 / 6) * 1), "y": int(start_y + height * (1 / 6) * 1)}
    point_2 = {"x": int(start_x + width * (1 / 6) * 3), "y": int(start_y + height * (1 / 6) * 1)}
    point_3 = {"x": int(start_x + width * (1 / 6) * 5), "y": int(start_y + height * (1 / 6) * 1)}
    point_4 = {"x": int(start_x + width * (1 / 6) * 1), "y": int(start_y + height * (1 / 6) * 3)}
    point_5 = {"x": int(start_x + width * (1 / 6) * 3), "y": int(start_y + height * (1 / 6) * 3)}
    point_6 = {"x": int(start_x + width * (1 / 6) * 5), "y": int(start_y + height * (1 / 6) * 3)}
    point_7 = {"x": int(start_x + width * (1 / 6) * 1), "y": int(start_y + height * (1 / 6) * 5)}
    point_8 = {"x": int(start_x + width * (1 / 6) * 3), "y": int(start_y + height * (1 / 6) * 5)}
    point_9 = {"x": int(start_x + width * (1 / 6) * 5), "y": int(start_y + height * (1 / 6) * 5)}
    keys = {
      1: point_1,
      2: point_2,
      3: point_3,
      4: point_4,
      5: point_5,
      6: point_6,
      7: point_7,
      8: point_8,
      9: point_9
    }
    return keys
  def gesture_password(self, element: WebElement, *pwd):
    """手势密码: 直接输入需要链接的点对应的数字,最多9位
    pwd: 1, 2, 3, 6, 9
    """
    if len(pwd) > 9:
      raise ValueError("需要设置的密码不能超过9位!")
    keys_dict = self.get_password_location(element)
    start_point = "TouchAction(self.driver).press(x={0}, y={1}).wait(200)". \

      format(keys_dict[pwd[0]]["x"], keys_dict[pwd[0]]["y"])
    for index in range(len(pwd) - 1): # 0,1,2,3
      follow_point = ".move_to(x={0}, y={1}).wait(200)". \

        format(keys_dict[pwd[index + 1]]["x"] - keys_dict[pwd[index]]["x"],
            keys_dict[pwd[index + 1]]["y"] - keys_dict[pwd[index]]["y"])
      start_point = start_point + follow_point
    full_point = start_point + ".release().perform()"
    return eval(full_point)
  def find_element(self, locator: tuple, timeout=30) -> WebElement:
    wait = WebDriverWait(self.driver, timeout)
    try:
      element = wait.until(lambda driver: driver.find_element(*locator))
      return element
    except (NoSuchElementException, TimeoutException):
      print('no found element {} by {}', format(locator[1], locator[0]))
if __name__ == '__main__':
  pass
"""
------------------------------------
@Time : 2019/8/6 20:47
@Auth : linux超
@File : test.py
@IDE : PyCharm
@Motto: Real warriors,dare to face the bleak warning,dare to face the incisive error!
@QQ  : 28174043@qq.com
@GROUP: 878565760
------------------------------------
"""
import time
import unittest
from appium import webdriver
from appium.webdriver.common.mobileby import MobileBy
from base import Base
class TestGesture(unittest.TestCase):
  def setUp(self):
    desired = {
      "automationName": "uiautomator1",
      "platformName": "Android",
      "platformVersion": '5.1.1',
      "deviceName": "127.0.0.1:62001",
      "appPackage": "com.xxzb.fenwoo",
      "appActivity": "com.xxzb.fenwoo.activity.addition.WelcomeActivity",
      "app": r"D:\AppAutoTest\appPackage\Future-release-2018.apk",
      "unicodeKeyboard": True, # 屏蔽键盘
      "resetKeyboard": True
    }
    self.driver = webdriver.Remote(command_executor="http://127.0.0.1:4723/wd/hub",
                    desired_capabilities=desired)
    self.base = Base(self.driver)
  def test_gesture_password(self):
    self.base.skip_welcome_page('left', 3) # 滑动屏幕
    time.sleep(3) # 为了看滑屏的效果
    self.driver.start_activity(app_package="com.xxzb.fenwoo",
                  app_activity=".activity.user.CreateGesturePwdActivity")
    commit_btn = (MobileBy.ID, 'com.xxzb.fenwoo:id/right_btn')
    password_gesture = (MobileBy.ID, 'com.xxzb.fenwoo:id/gesturepwd_create_lockview')
    element_commit = self.base.find_element(commit_btn)
    element_commit.click()
    password_element = self.base.find_element(password_gesture)
    self.base.gesture_password(password_element, 1, 2, 3, 6, 5, 4, 7, 8, 9)
    time.sleep(5) # 看效果
  def tearDown(self):
    self.driver.quit()
if __name__ == '__main__':
  unittest.main()
测试效果
包含滑动屏幕
总结
最后,我们再总结一下完成所有的操作需要掌握的知识点
1.滑动屏幕时起始位置和结束位置应该从哪里开始与结束,如何获取
2.滑动屏幕使用的swipe()方法如何使用
3.实现多次滑动方法的实现原理,这里用到了反射,其实使用if也可以实现一样的效果,但是总感觉if有点low
4.9宫格起始位置与手机屏幕的关系及每个点的坐标如何计算
5.TouchAction类中的常用方法如何使用
6.理解绘制手势密码方法的封装原理及思路
以上所述是小编给大家介绍的使用swipe方法模拟屏幕滑动与手势密码绘制,希望对大家有所帮助,如果大家有任何疑问请给我留言,小编会及时回复大家的。在此也非常感谢大家对脚本之家网站的支持!
如果你觉得本文对你有帮助,欢迎转载,烦请注明出处,谢谢!
您可能感兴趣的文章:- vue-awesome-swiper 基于vue实现h5滑动翻页效果【推荐】
- 解决Vue中引入swiper,在数据渲染的时候,发生不滑动的问题
- Swiper 4.x 使用方法(移动端网站的内容触摸滑动)
- swiper 解决动态加载数据滑动失效的问题
- 移动端触摸滑动插件swiper使用方法详解
- AngularJS 中使用Swiper制作滚动图不能滑动的解决方法
- 移动端滑动插件Swipe教程
- 详解SwipeListView框架实现微信\QQ滑动删除效果
- Android 简易手势密码开源库详解
- Android自定义控件实现手势密码


 咨 询 客 服