安装PHPUnit
使用 Composer 安装 PHPUnit
#查看composer的全局bin目录 将其加入系统 path 路径 方便后续直接运行安装的命令
composer global config bin-dir --absolute
#全局安装 phpunit
composer global require --dev phpunit/phpunit
#查看版本
phpunit --version
使用Composer构建你的项目
我们将新建一个unit项目用于演示单元测试的基本工作流
创建项目结构
mkdir unit  cd unit  mkdir app tests reports
#结构如下
./
├── app #存放业务代码
├── reports #存放覆盖率报告
└── tests #存放单元测试
使用Composer构建工程
#一路回车即可
composer init

#注册命名空间
vi composer.json
...
  "autoload": {
    "psr-4": {
      "App\\": "app/",
      "Tests\\": "tests/"
    }
  }
...
#更新命名空间
composer dump-autoload

#安装 phpunit 组件库
composer require --dev phpunit/phpunit
到此我们就完成项目框架的构建,下面开始写业务和测试用例。
编写测试用例
创建文件app/Example.php 这里我为节省排版就不写注释了
?php
namespace App;

class Example
{
  private $msg = "hello world";

  public function getTrue()
  {
    return true;
  }

  public function getFalse()
  {
    return false;
  }

  public function setMsg($value)
  {
    $this->msg = $value;
  }

  public function getMsg()
  {
    return $this->msg;
  }
}
创建相应的测试文件tests/ExampleTest.php
?php
namespace Tests;

use PHPUnit\Framework\TestCase as BaseTestCase;
use App\Example;

class ExampleTest extends BaseTestCase
{
  public function testGetTrue()
  {
    $example = new Example();
    $result = $example->getTrue();
    $this->assertTrue($result);
  }

  public function testGetFalse()
  {
    $example = new Example();
    $result = $example->getFalse();
    $this->assertFalse($result);
  }

  public function testGetMsg()
  {
    $example = new Example();
    $result = $example->getTrue();
    // $result is world not big_cat
    $this->assertEquals($result, "hello big_cat");
  }
}
执行单元测试
[root@localhost unit]# phpunit --bootstrap=vendor/autoload.php \

tests/

PHPUnit 6.5.14 by Sebastian Bergmann and contributors.

..F                                 3 / 3 (100%)

Time: 61 ms, Memory: 4.00MB

There was 1 failure:

1) Tests\ExampleTest::testGetMsg
Failed asserting that 'hello big_cat' matches expected true.

/opt/unit/tests/ExampleTest.php:27
/root/.config/composer/vendor/phpunit/phpunit/src/TextUI/Command.php:195
/root/.config/composer/vendor/phpunit/phpunit/src/TextUI/Command.php:148

FAILURES!
Tests: 3, Assertions: 3, Failures: 1.
这是一个非常简单的测试用例类,可以看到,执行了共3个测试用例,共3个断言,共1个失败,可以参照PHPUnit手册学习更多高级用法。
代码覆盖率
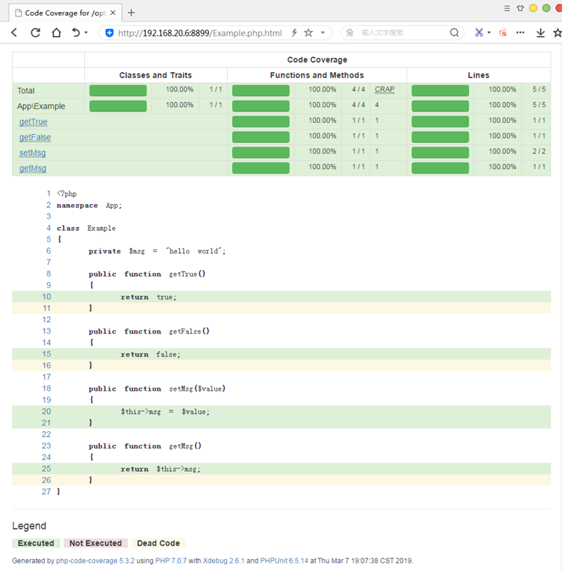
代码覆盖率反应的是测试用例对测试对象的行,函数/方法,类/特质的访问率是多少(PHP_CodeCoverage 尚不支持 Opcode覆盖率、分支覆盖率 及 路径覆盖率),虽然有很多人认为过分看重覆盖率是不对的,但我们初入测试还是俗气的追求一下吧。
测试覆盖率的检测对象是我们的业务代码,PHPUnit通过检测我们编写的测试用例调用了哪些函数,哪些类,哪些方法,每一个控制流程是否都执行了一遍来计算覆盖率。
PHPUnit 的覆盖率依赖 Xdebug,可以生成多种格式:
--coverage-clover file>  Generate code coverage report in Clover XML format.
--coverage-crap4j file>  Generate code coverage report in Crap4J XML format.
--coverage-html dir>    Generate code coverage report in HTML format.
--coverage-php file>    Export PHP_CodeCoverage object to file.
--coverage-text=file>   Generate code coverage report in text format.
--coverage-xml dir>    Generate code coverage report in PHPUnit XML format.
同时需要使用 --whitelist dir参数来设定我们需要检测覆盖率的业务代码路径,下面演示一下具体操作:
phpunit \

--bootstrap vendor/autoload.php \

--coverage-html=reports/ \

--whitelist app/ \

tests/
#查看覆盖率报告
cd reports/  php -S 0.0.0.0:8899


这样我们就对业务代码App\Example做单元测试,并且获得我们单元测试的代码覆盖率,现在自然是百分之百,因为我的测试用例已经访问了App\Example的所有方法,没有遗漏的,开发中则能体现出你的测试时用力对业务代码测试度的完善性。
基境共享测试数据
可能你会发现我们在每个测试方法中都创建了App\Example对象,在一些场景下是重复劳动,为什么不能只创建一次然后供其他测试方法访问呢?这需要理解 PHPUnit 执行测试用例的工作流程。
我们没有办法在不同的测试方法中通过某成员属性来传递数据,因为每个测试方法的执行都是新建一个测试类对象,然后调用相应的测试方法。
即测试的执行模式并不是
testObj = new ExampleTest();
testObj->testMethod1();
testObj->testMethod2();
而是
testObj1 = new ExampleTest();
testObj1->testMethod1();

testObj2 = new ExampleTest();
testObj2->testMethod2();
所以testMethod1()修改的属性状态无法传递给 testMethod2()使用。
PHPUnit则为我们提供了全面的hook接口:
public static function setUpBeforeClass()/tearDownAfterClass()//测试类构建/解构时调用
protected function setUp()/tearDown()//测试方法执行前/后调用
protected function assertPreConditions()/assertPostConditions()//断言前/后调用
当运行测试时,每个测试类大致就是如下的执行步骤
#测试类基境构建
setUpBeforeClass

#new一个测试类对象
#第一个测试用例
setUp
assertPreConditions
assertPostConditions
tearDown

#new一个测试类对象
#第二个测试用例
setUp
assertPreConditions
assertPostConditions
tearDown
...

#测试类基境解构
tearDownAfterClass
所以我们可以在测试类构建时使用setUpBeforeClass创建一个 App\Example 对象作为测试类的静态成员变量(tearDownAfterClass主要用于一些资源清理,比如关闭文件,数据库连接),然后让每一个测试方法用例使用它:
?php
namespace Tests;

use App\Example;
use PHPUnit\Framework\TestCase as BaseTestCase;

class ExampleTest extends BaseTestCase
{
  // 类静态属性
  private static $example;

  public static function setUpBeforeClass()
  {
    self::$example = new Example();
  }

  public function testGetTrue()
  {
    // 类的静态属性更新
    self::$example->setMsg("hello big_cat");
    $result = self::$example->getTrue();
    $this->assertTrue($result);
  }

  public function testGetFalse()
  {
    $result = self::$example->getFalse();
    $this->assertFalse($result);
  }

  /**
   * 依赖 testGetTrue 执行完毕
   * @depends testGetTrue
   * @return [type] [description]
   */
  public function testGetMsg()
  {
    $result = self::$example->getMsg();
    $this->assertEquals($result, "hello big_cat");
  }
}
或者使用@depends注解来声明二者的执行顺序,并使用传递参数的方式来满足需求。
public function testMethod1()
{
  $this->assertTrue(true);
  return "hello";
}

/**
 * @depends testMethod1
 */
public function testMethod2($str)
{
  $this->assertEquals("hello", $str);
}
#执行模式大概如下
testObj1 = new Test;
$str = testObj1->testMethod1();

testObj2 = new Test;
testObj2->testMethod2($str);
理解测试执行的模式还是很有帮助的,其他高级特性请浏览官方文档。
使用phpunit.xml编排测试套件
使用测试套件来管理测试,vi phpunit.xml:
?xml version="1.0" encoding="UTF-8"?>
phpunit backupGlobals="false"
     backupStaticAttributes="false"
     bootstrap="./vendor/autoload.php"
     colors="true"
     convertErrorsToExceptions="true"
     convertNoticesToExceptions="true"
     convertWarningsToExceptions="true"
     processIsolation="false"
     stopOnFailure="false">
  testsuites>
    !--可以定义多个 suffix 用于指定待执行的测试类文件后缀-->
    testsuite name="Tests">
      directory suffix="Test.php">./test/directory>
    /testsuite>
  /testsuites>
  filter>
    whitelist processUncoveredFilesFromWhitelist="true">
      !--可以定义多个 对./app下的业务代码做覆盖率统计-->
      directory suffix=".php">./app/directory>
    /whitelist>
  /filter>
  logging>
    !--覆盖率报告生成类型和输出目录 lowUpperBound低覆盖率阈值 highLowerBound高覆盖率阈值-->
    log type="coverage-html" target="./reports" lowUpperBound="35" highLowerBound="70"/>
  /logging>
/phpunit>
然后直接运phpunit行即可:
[root@localhost unit]# phpunit
PHPUnit 6.5.14 by Sebastian Bergmann and contributors.

Time: 81 ms, Memory: 4.00MB

No tests executed!

Generating code coverage report in HTML format ... done
以上就是本文的全部内容,希望对大家的学习有所帮助,也希望大家多多支持脚本之家。
您可能感兴趣的文章:- PHPUnit 单元测试安装与使用入门教程
- ThinkPHP5与单元测试PHPUnit使用详解
- PHP单元测试配置与使用方法详解
- PHPUnit + Laravel单元测试常用技能
- PHP使用phpunit进行单元测试示例
- PHPStorm中如何对nodejs项目进行单元测试详解
- PHP单元测试框架PHPUnit用法详解
- thinkPHP框架单元测试库tpunit用法示例
- 浅谈如何提高PHP代码质量之单元测试
 咨 询 客 服