| 值 | 描述 |
|---|---|
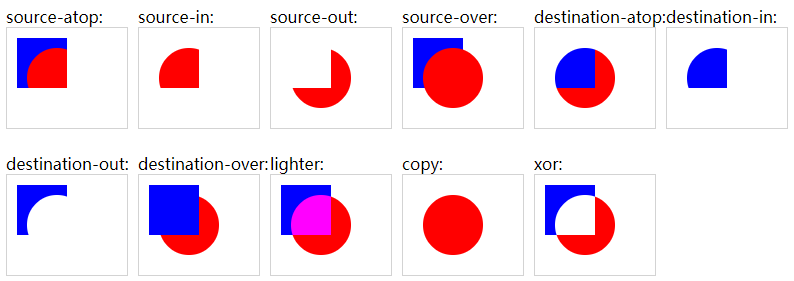
| source-over | 默认。在目标图像上显示源图像。 |
| source-atop | 在目标图像顶部显示源图像。源图像位于目标图像之外的部分是不可见的。 |
| source-in | 在目标图像中显示源图像。只有目标图像内的源图像部分会显示,目标图像是透明的。 |
| source-out | 在目标图像之外显示源图像。只会显示目标图像之外源图像部分,目标图像是透明的。 |
| destination-over | 在源图像上方显示目标图像。 |
| destination-atop | 在源图像顶部显示目标图像。源图像之外的目标图像部分不会被显示。 |
| destination-in | 在源图像中显示目标图像。只有源图像内的目标图像部分会被显示,源图像是透明的。 |
| destination-out | 在源图像外显示目标图像。只有源图像外的目标图像部分会被显示,源图像是透明的。 |
| lighter | 显示源图像 + 目标图像。 |
| copy | 显示源图像。忽略目标图像。 |
| xor | 使用异或操作对源图像与目标图像进行组合。 |
<!DOCTYPE html>
<html>
<head>
<style>
canvas
{
border:1px solid #d3d3d3;
margin-right:10px;
margin-bottom:20px;
}
</style>
</head>
<body>

<script>

var gco=new Array();
gco.push("source-atop");
gco.push("source-in");
gco.push("source-out");
gco.push("source-over");
gco.push("destination-atop");
gco.push("destination-in");
gco.push("destination-out");
gco.push("destination-over");
gco.push("lighter");
gco.push("copy");
gco.push("xor");
for (n=0;n<gco.length;n++)
    {
    document.write("<div id='p_" + n + "' style='float:left;'>" + gco[n] + ":<br>");
    var c=document.createElement("canvas");
    c.width=120;
    c.height=100;
    document.getElementById("p_" + n).appendChild(c);
    var ctx=c.getContext("2d");
    ctx.fillStyle="blue";
    ctx.fillRect(10,10,50,50);
    ctx.globalCompositeOperation=gco[n];
    ctx.beginPath();
    ctx.fillStyle="red";
    ctx.arc(50,50,30,0,2*Math.PI);
    ctx.fill();
    document.write("</div>");
    }

</script>

</body>
</html>

可以看出如果设置成destination-out,就可以清除canvas现有的像素点的图像。
清除绘制到画布上的线条(点擦除,线擦除)
在我最近实现的项目中有画笔功能, 同时画笔画出的线条可以被橡皮擦擦除,有点擦除和线擦除两种方式。
使用以上两种方法也可以,但是如果这些线条不止绘制一次的话呢,中间有其他操作(例如绘制的内容变换一次后)那上面的方法就不容易做到了,因为要反复绘制存储每次擦除后的数据,简单的为了能达到该目的,可以将整个canvas画布转化成base64编码的image,后面再次绘制的时候把这个image数据再绘制到canvas上,可以继续在这个canvas上进行绘制和擦除内容。但是怎么样也不好做到线擦除的功能了!
下面介绍另外一种存储绘制路径点坐标的方法去实现绘制线条后的点擦除和线擦除的功能。
首先介绍下存储线条的数据结构,之前写的一篇《js实现存储对象的数据结构hashTable和list》大家可以先大致看看hash结构的实现,但是key和value快速查找的优势需要清楚。另外在canvas画的各种形状和线条,我们是如何知道点击到哪个元素哪条线?《软件项目技术点(4)——实现点击画布上元素》这篇博客里有说明实现原理。
1. 线条存储及绘制
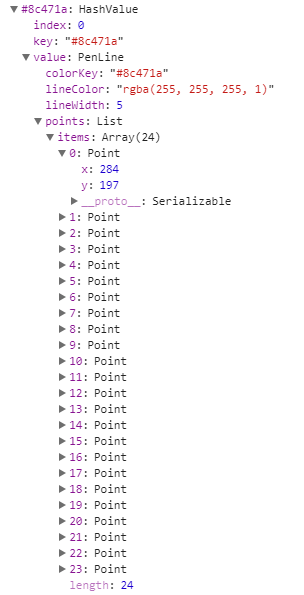
项目中我存储的线条hash结构的对象如下:

展开第一个线条key值为“#8c471a”的具体信息如下,value值其中有colorKey,lineColor,lineWidth,以及最重要的List结构的points对象,是一个存储了该线条所有点坐标集合的List对象。

下面的一段代码,实现了绘制该线条到画布。使用二次贝塞尔函数使得绘制出来的线条流畅平滑没有折痕,当只有一个点时可绘制出一个圆点。
var count = this.points.length();
                var p: Core.Point = this.points.get(0);
                if (isDrawHit) {
                    ctx.strokeStyle = this.colorKey;
                }
                else {
                    ctx.strokeStyle = this.lineColor;
                }
                ctx.lineCap = "round";
                ctx.lineJoin = 'round';//转折的时候不出现尖角
                if (ctx.canvas.id == "hitCanvas")
                    ctx.lineWidth = this.lineWidth + eraserRadius;//扩大hit上线条的范围,橡皮半径
                else
                    ctx.lineWidth = this.lineWidth;
                ctx.beginPath();
                if (count >= 2) {
                    ctx.moveTo(p.x, p.y);
                    for (var i = 1; i < count - 2; i++) {
                        // p = this.points.get(i);
                        // ctx.lineTo(p.x, p.y);
                        if (this.points.get(i).x == this.points.get(i + 1).x && this.points.get(i).y == this.points.get(i + 1).y)
                            continue;
                        var c = (this.points.get(i).x + this.points.get(i + 1).x) / 2;
                        var d = (this.points.get(i).y + this.points.get(i + 1).y) / 2;
                        ctx.quadraticCurveTo(this.points.get(i).x, this.points.get(i).y, c, d); //二次贝塞曲线函数
                    }
                    // For the last 2 points
                    if (count >= 3) {
                        ctx.quadraticCurveTo(
                            this.points.get(i).x,
                            this.points.get(i).y,
                            this.points.get(i + 1).x,
                            this.points.get(i + 1).y
                        );
                    } else if (count >= 2) {
                        ctx.lineTo(this.points.get(1).x, this.points.get(1).y);
                    }
                    ctx.stroke();
                } else {
                    if (isDrawHit) {
                        ctx.fillStyle = this.colorKey;
                    }
                    else {
                        ctx.fillStyle = this.lineColor;
                    }
                    if (ctx.canvas.id == "hitCanvas")
                        var radius = this.lineWidth + eraserRadius;//扩大hit上线条的范围,橡皮半径
                    else
                        var radius = this.lineWidth;
                    ctx.arc(this.points.get(0).x, this.points.get(0).y, radius, 0, 2 * Math.PI);
                    ctx.fill();
                }
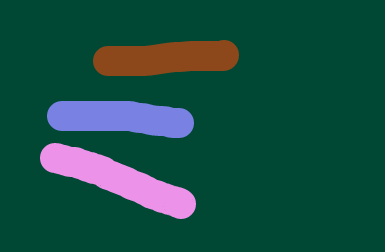
其中绘制到hitCanvas上的时候将lineWidth扩大加上了eraserRadius(圆形橡皮擦半径),下图即为绘制到hitCanvas上的colorKey颜色线条,每个线条颜色值是上图中的key值colorKey。另外线条粗细明显比上面的白色线条要粗很多,因为橡皮擦是个cur鼠标样式它的半径很大,但获取的鼠标点击位置还只是一个像素点坐标,所以为了扩大鼠标点到线条上的范围将其变粗。

2. 线擦除和点擦除
这样线擦除就很容易实现,只需要找到橡皮擦点到画布上的坐标点的色值,就其从hash集合中根据colorKey删除掉该项,即实现了删除整条线。
点擦除就需要考虑到从两端擦除或者从中间擦除的情况:
         if (that.isErasePoint) {
                      line.points.foreach(function (i, p) {
                          //橡皮擦距离该线条上点的距离是否在橡皮擦半径范围内
                          if (Math.pow(p.x - point.x, 2) + Math.pow(p.y - point.y, 2) <= Math.pow(eraserRadius, 2)) {
                              isSeparate = true;
			      //已经找到橡皮擦半径范围内的点,该点不存入两个集合中的任何一个
                          } else {
                              if (isSeparate)
			      //找到后将之后的点存入另一个点集合points中
                                  points2.add(p);
                           else//找到之前将点存入点集合points1中
                                 points.add(p);
                         }
                     })
                     //遍历完线条points上的所有点后。根据points1和points2是否为空处理点擦除后的线条
                    if (points1.length() >= 1 && points2.length() >= 1) {
		    //points1和points2都不为空,说明从中间擦除变为两条线
                         var preLine = editor.commonEditLogic.clonePenLine(line);
                        line.points = points1;
                         var linePen = editor.bdCanvas.elementFactory.createPenLine(point, line.lineWidth, line.lineColor);
                         linePen.points = points2;
                           editor.bdCanvas.activeElement.setPenLine(linePen.colorKey, linePen);
                     }
		     else if (points1.length() == 0 && points2.length() >= 1)
		     {
		           //从一端擦除
                         line.points = points2;
                     }
		     else if (points1.length() >= 1 && points2.length() == 0)
		     {
		         //从一端擦除
                         line.points = points1;
                     }
		     else if (points1.length() == 0 && points2.length() == 0)
		     {
		            //线条上的点全部被擦除,删除该线条
                            editor.bdCanvas.activeElement.delPenLine(line.colorKey);
			    }
                     editor.courseware.currentBlackboard.draw(false, true);
               }
到此这篇关于清除canvas画布内容(点擦除+线擦除)的文章就介绍到这了,更多相关canvas画布清除内容请搜索脚本之家以前的文章或继续浏览下面的相关文章,希望大家以后多多支持脚本之家!
 咨 询 客 服