本文介绍了通过nginx代理拦截请求进行全局访问限制,分享给大家,具体如下:
运行环境:
- Ubantu 14.0
- tomcat7
- nginx 1.4.6(更新后1.5.6)
项目中经常会用到权限管理,必然的就会存在权限的设定和验证;对于登陆或者模块的权限设定验证,在项目中直接实现;那么问题出现了
1.访问资源文件
2.多项目访问权限
3.tomcat中虚拟目录的访问权限
公司项目中用到文件的上传下载,在线预览等功能;当然用户在使用的时候,我们不可能把用户的上传的文件放在项目中,那么必然会用到
虚拟目录来映射文件的位置,或者说跨域夸项目;如果没有对这些进行一个访问的权限的限制,那么你将可以不需要任何权限就可以访问下载
服务器上的资源(只要路径正确不需要任何权限),下面拿公司项目实际情况说明一下:
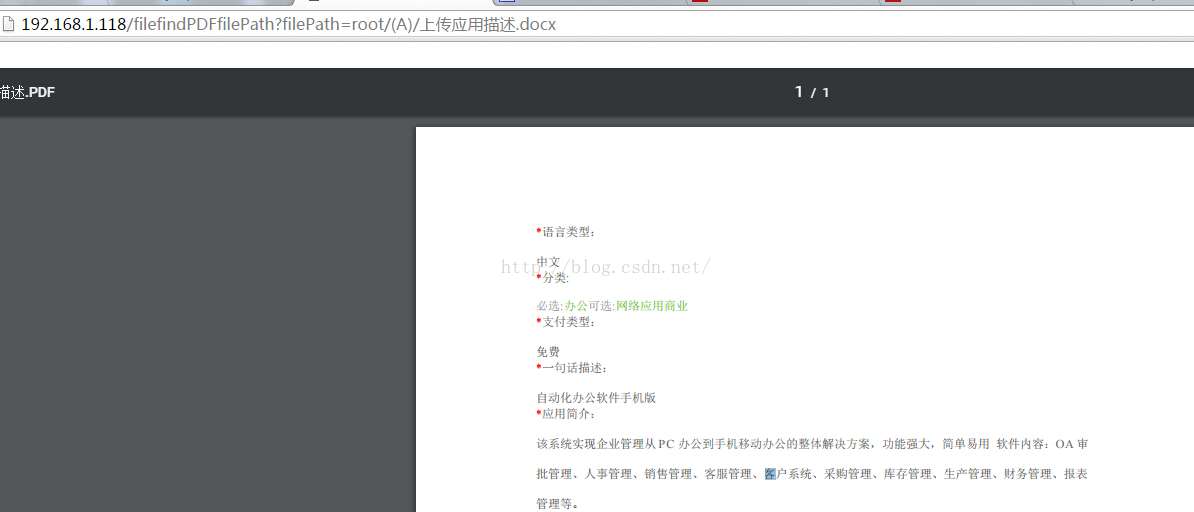
比如访问: http://192.168.1.118/filefindPDFfilePath?filePath=root/(A)/上传应用描述.docx 将出现

filefindPDFfilePath?filePath=root/(A)/上传应用描述.docx http 请求会返回 /imgss/(A)/上传应用描述.docx(imgss是tomcat server.xml配置的虚拟目录)
打开浏览器我们直接访问虚拟目录:http://192.168.1.118/imgss/(A)/上传应用描述.docx 将出现不需要任何权限可以预览或者使用工具下载服务器资源

这会导致客户在使用时,在稍有心思的人面前没有任何安全可言
下面说一下如何解决这个问题:
第一种方案:设置tomcat全局过滤器,进行session验证
1.项目中添加过滤器 UserLoginFilter.java(这里就不赘述了)
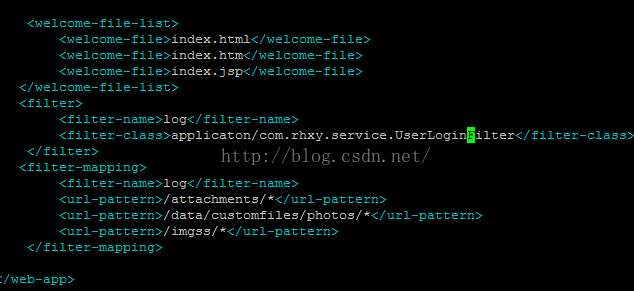
2.在tomcat 配置文件web.xml添加Filter

注意这里:applicaton/com.rhxy.service.UserLoginFilter 指向项目中的UserLoginFilter过滤器
这里需要说明一下。配置的拦截请求都是tomcat server.xml中配置的虚拟路径
而所有的访问资源的请求都是需要经过这里,所以直接设置虚拟路径即可
启动tomcat 重新部署项目;进行测试。结果如下
未登录情况下
访问:http://192.168.1.118/filefindPDFfilePath?filePath=root/(A)/12.png 打开tomcat 日志进行观察:

观察一下前台:


未登录情况下被成功被过滤掉了
测试直接访问虚拟目录:http://192.168.1.118/imgss/(A)/12.png同样被拦截
然后测试登陆后访问,就出现问题了。请求是被过滤了,但是权限验证合格以后请求返回的status 居然是404
后台日志:

前台:


http://192.168.1.118/filefindPDFfilePath?filePath=root/(A)/12.png
http://192.168.1.118/imgss/(A)/12.png 通过后台观察,请求都是有经过过滤器进行session验证,并且都是验证通过,然而还是出现404,资源在
服务器中是肯定存在的,tomcat 中的虚拟目录设置也没有问题;经过多次测试问题出在tomcat配置文件web.xml配置的过滤器,映射的是项目中的过滤器
那么将过滤器打包成jar 以后,放置在tomcat 中,然后修改web.xml配置文件,修改Filter 中filter-class 为jar包打包的路径,然后测试发现项目无法启动。
在配置Filter 中filter-class 路径时出错;然后经过一系列尝试,最终还是失败,因为时间有限,所以只能放弃这种,但是我相信思路肯定是正确的,因为
听说已经有人实现了,但是没有具体说明,下面开始尝试第二种
第二种方案:通过nginx代理拦截请求,并进行访问限制
1.使用 nginx -V 查看版本几安装的模块,查看是否有ngx_http_accesskey_module模块,没有的话需要为nginx加入ngx_http_accesskey_module模块(附件),因为我的版本是1.4.6上面很多模块都没有,先进行升级
1.1)下载nginx-1.5.6.tar.gz (文件位置在/root下)
wget http://nginx.org/download/nginx-1.5.6.tar.gz
1.2)解压nginx-1.5.6.tar.gz文件
tar zxvf nginx-1.5.6.tar.gz
1.3)进入ngixn-1.5.6文件夹中
1.4)查看nginx原来的配置输出:
--prefix=/etc/nginx--conf-path=/etc/ nginx/nginx.conf--error-log-path=/var/log/nginx/error.log --http-client-body-te mp-path=/var/lib/nginx/body--http-fastcgi-temp-path=/var/lib/nginx/fastcgi --http-log-path=/var/log/nginx/access.log--http-proxy-temp-path=/var/lib/nginx/proxy --http-scgi-temp-path=/var/lib/nginx/scgi--http-uwsgi-temp-path=/var/lib/nginx/uwsgi --lock-path=/var/lock/nginx.lock --pid-path=/var/run/nginx.pid--with-http_realip_module --with-http_stub_status_module--with-http_ssl_module
--with-debug--with-http_addition_module --with-http_dav_module --with-http_geoip_module --with-http_gzip_static_module --with-http_realip_module --with-http_stub_status_module --with-http_ssl_module --with-http_sub_module --with-http_xslt_module --with-ipv6--with-sha1=/usr/include/openssl --with-md5=/usr/include/openssl
--with-mail--with-mail_ssl_module
2.下载ngx_http_accesskey_module模块
2.1)mkdir -p /etc/nginx/third-modules
2.2)cd /etc/nginx/third-modules
2.3)wget ftp://91.193.69.2/distributive/FreeBSD/ports/local-distfiles/osa/nginx-accesskey-2.0.3.tar.gz
2.4)tar -zxvf nginx-accesskey-2.0.3.tar.gz
2.5)修改下nginx-accesskey-2.0.3的config文件:把$HTTP_ACCESSKEY_MODULE修改成ngx_http_accesskey_module
3.返回root下nginx-1.5.6
3.1)执行configure命令,后面跟上原来nginx的配置 并添加ngx_http_accesskey_module
./configure --prefix=/etc/nginx --conf-path=/etc/nginx/nginx.conf --error-log-path=/var/log/nginx/error.log --http-client-body-temp-path=/var/lib/nginx/body --http-fastcgi-temp-path=/var/lib/nginx/fastcgi --http-log-path=/var/log/nginx/access.log --http-proxy-temp-path=/var/lib/nginx/proxy --http-scgi-temp-path=/var/lib/nginx/scgi --http-uwsgi-temp-path=/var/lib/nginx/uwsgi --lock-path=/var/lock/nginx.lock --pid-path=/var/run/nginx.pid --with-http_realip_module --with-http_stub_status_module --with-http_ssl_module --with-debug --with-http_addition_module --with-http_dav_module --with-http_geoip_module --with-http_gzip_static_module --with-http_realip_module --with-http_stub_status_module --with-http_ssl_module --with-http_sub_module --with-http_xslt_module --with-ipv6 --with-sha1=/usr/include/openssl --with-md5=/usr/include/openssl --with-mail --with-mail_ssl_module --add-module=/etc/nginx/third-modules/nginx-accesskey-2.0.3
在执行configure时得到几个错误:
a.配置 --with-http_xslt_module 时提示 the HTTP XSLT module requires the libxml2/libxslt libraries
sudo apt-get install libxml2 libxml2-dev libxslt-dev
b.配置 --with-http_image_filter_module 时提示 the HTTP image filter module requires the GD library.
sudo apt-get install libgd2-xpm libgd2-xpm-dev
c.配置 --with-http_geoip_module 时提示 the GeoIP module requires the GeoIP library.
sudo apt-get install geoip-database libgeoip-dev
d.rewrite需要pcre支持, 错误提示:./configure: error: the HTTP rewrite module requires the PCRE library.
apt-get install libpcre3 libpcre3-dev
e.ubuntu error: SSL modules require the OpenSSL library.
sudo apt-get install openssl libssl-dev
3.2)再执行第6步的configure命令
3.3)这次没有提示缺少library, 执行make令命编译nginx, 编译好以后objs目录下多出一个nginx文件,这个就是已编辑好的nginx程序
3.4)更改旧的nginx程序的名子,并复制新的程序过去,我的旧nginx程序放在/usr/sbin/目录中
mv /usr/sbin/nginx /usr/sbin/nginx-20160910
cp objs/nginx /usr/sbin/nginx
/usr/sbin/nginx -t
执行/usr/sbin/nginx -t 命令检查配置文件并将返回下面的信息:
nginx: the configuration file /etc/nginx/nginx.conf syntax is ok
nginx: configuration file /etc/nginx/nginx.conf test is successful
3.5)在nginx-1.5.6目录下执行下面的命令来升级nginx
3.6)执行make upgrade得到一个错误:
make: /etc/nginx/sbin/nginx: Command not foundmake: *** [upgrade] Error 127
3.7)用文本编辑器打开修改nginx-1.5.6目录下名为Makefile的文件,将upgrade节点中的/etc/nginx/sbin/nginx -t改为/usr/sbin/nginx -t,保存后关闭并重新执行make upgrade命令
3.8)执行nginx -V命令,程序的版本号已经是1.5.6,升级完毕.
4.修改nginx配置文件 vim /etc/nginx/sites-available/localhost
location ^~ /imgss/
    {
    # root /data/customfiles/photos/;
    # expires 30d;
    accesskey off;
    accesskey_arg "sign";
    accesskey_hashmethod md5;
    accesskey_signature "xxxxxxx";
    proxy_set_header  Host $host;
    proxy_pass http://127.0.0.1:8080;
    }
accesskey 为模块开关;
accesskey_hashmethod 为加密方式MD5或者SHA-1;
accesskey_arg 为url中的关键字参数;
accesskey_signature 为xxxxxxx加密值构成的字符串。
保存后,重启nginx :service nginx restart ?sign=(这里为accesskey_signature MD5加密值)
再次进行测试,使用http://192.168.1.118/filefindPDFfilePath?filePath=root/(A)/12.png进行访问,将请求返回的URl /imgss/(A)/上传应用描述.docx后面添加?sign=(这里为accesskey_signature MD5加密值)
测试结果:未登录情况下 http://192.168.1.118/filefindPDFfilePath?
filePath=root/(A)/12.png http://192.168.1.118/imgss/(A)/12.png
都将返回404页面。登陆后返回正常页面,显示12.png
以上就是本文的全部内容,希望对大家的学习有所帮助,也希望大家多多支持脚本之家。
 咨 询 客 服