这几天研究了一下将spring boot应用打入到docker中运行,先前有一个maven插件,可以直接在src/main中建一个docker文件夹,新建一个Dockerfile文件,在进行编译打包之后,可以直接运行docker插件,相当于在对应的docker目录中执行 docker build .命令,会直接将当前应用打成镜像,然后运行,十分方便,但是在个人经过测试后发现,这个插件并不稳定,docker文件夹不一定每次都会打到target文件夹下,因此就会导致这个插件执行起来并没有多大用处。
因此我在后来再将spring boot应用打成镜像的时候,不再使用提供的docker maven插件,而是单独在当前项目的根目录下新建一个Dockerfile文件,应用编写完了之后,直接手动执行命令将应用打成镜像,具体如下。
springboot应用
pom.xml
在这里的pom.xml中需要指定几个仓库,以及提供几个插件,具体如下:
<project xmlns="http://maven.apache.org/POM/4.0.0" xmlns:xsi="http://www.w3.org/2001/XMLSchema-instance"
 xsi:schemaLocation="http://maven.apache.org/POM/4.0.0 http://maven.apache.org/xsd/maven-4.0.0.xsd">
 <modelVersion>4.0.0</modelVersion>

 <groupId>cn.com</groupId>
 <artifactId>springbootweb</artifactId>
 <version>1.0-SNAPSHOT</version>
 <packaging>jar</packaging>

 <name>spring :: boot :: web</name>

 <parent>
  <groupId>org.springframework.boot</groupId>
  <artifactId>spring-boot-starter-parent</artifactId>
  <version>1.4.1.RELEASE</version>
  <relativePath/>
 </parent>

 <properties>
  <project.build.sourceEncoding>UTF-8</project.build.sourceEncoding>
  <docker.image.prefix>springio</docker.image.prefix>
  <docker.version>0.3.8</docker.version>
  <java.version>1.8</java.version>
 </properties>

 <dependencies>
  <dependency>
   <groupId>org.springframework.boot</groupId>
   <artifactId>spring-boot-starter-web</artifactId>
  </dependency>
 </dependencies>


 <repositories>
  <repository>
   <id>spring-snapshots</id>
   <url>http://repo.spring.io/snapshot</url>
   <snapshots>
    <enabled>true</enabled>
   </snapshots>
  </repository>
  <repository>
   <id>spring-milestones</id>
   <url>http://repo.spring.io/milestone</url>
   <snapshots>
    <enabled>true</enabled>
   </snapshots>
  </repository>
 </repositories>

 <pluginRepositories>
  <pluginRepository>
   <id>spring-snapshots</id>
   <url>http://repo.spring.io/snapshot</url>
  </pluginRepository>
  <pluginRepository>
   <id>spring-milestones</id>
   <url>http://repo.spring.io/milestone</url>
  </pluginRepository>
 </pluginRepositories>


 <build>
  <plugins>
   <plugin>
    <groupId>org.apache.maven.plugins</groupId>
    <artifactId>maven-compiler-plugin</artifactId>
    <version>3.2</version>
    <configuration>
     <compilerArgument>-parameters</compilerArgument>
     <source>1.8</source>
     <target>1.8</target>
     <encoding>UTF-8</encoding>
    </configuration>
   </plugin>
   <plugin>
    <groupId>org.apache.maven.plugins</groupId>
    <artifactId>maven-surefire-plugin</artifactId>
    <version>2.18.1</version>
    <configuration>
     <skipTests>true</skipTests>
    </configuration>
   </plugin>

   <plugin>
    <groupId>org.apache.maven.plugins</groupId>
    <artifactId>maven-resources-plugin</artifactId>
    <version>2.6</version>
    <configuration>
     <encoding>UTF-8</encoding>
    </configuration>
   </plugin>
   <plugin>
    <groupId>org.springframework.boot</groupId>
    <artifactId>spring-boot-maven-plugin</artifactId>
    <!--<version>${spring.boot.version}</version>-->
    <configuration>
     <mainClass>cn.com.SpringBootWebApplication</mainClass>
     <layout>ZIP</layout>
    </configuration>
    <executions>
     <execution>
      <goals>
       <goal>
        repackage
       </goal>
      </goals>
     </execution>
    </executions>
   </plugin>
  </plugins>
 </build>

 <profiles>
  <profile>
   <id>JDK1.8</id>
   <activation>
    <activeByDefault>true</activeByDefault>
   </activation>
   <properties>
    <maven.compiler.source>1.8</maven.compiler.source>
    <maven.compiler.target>1.8</maven.compiler.target>
    <encoding>UTF-8</encoding>
   </properties>
  </profile>
 </profiles>
</project>
这里的提供了几个仓库的地址,原因是因为本文中将springboot应用打进docker的时候,是直接将源码一起打进去,然后在里面进行编译打包之后进行运行,如果不提供仓库地址下载jar包,那么就会从中央仓库拉取依赖,那么速度会非常慢并且会出现拉取超时导致应用使用不了的情况,因此提供几个其他仓库地址下载依赖,另外这里有一个插件,使用这个插件后可以直接以 mvn spring-boot:run的形式运行应用,所以我也就没决定使用java -jar xxx.jar的方式来运行应用。
Application和controller
这个springboot应用相当简单,提供一个简单的controller,里面有一个类似与hello world的接口,如下:
package cn.com.controllers;

import org.springframework.web.bind.annotation.RequestMapping;
import org.springframework.web.bind.annotation.RestController;

import java.util.HashMap;
import java.util.Map;

/**
 * Created by xiaxuan on 16/11/27.
 */
@RestController
public class IndexController {

  @RequestMapping(value = "/index", produces = "application/json;charset=utf-8")
  public Object index() {
    Map<String, Object> result = new HashMap<String, Object>();
    result.put("msg", "hello world");
    return result;
  }
}
提供一个简单的helloworl的方法。
以下是Application启动类:
package cn.com;

import org.springframework.boot.SpringApplication;
import org.springframework.boot.autoconfigure.SpringBootApplication;

/**
 * Created by xiaxuan on 16/11/27.
 */
@SpringBootApplication
public class SpringBootWebApplication {

  public static void main(String[] args) {
    SpringApplication.run(SpringBootWebApplication.class, args);
  }
}
正常的spring boot的启动中,相当简单,直接启动SpringBootWebApplication启动类即可,但是在docker容器中运行的话,则没有这么简单,看下下面的这个Dockerfile文件。
Dockerfile文件
Dockerfile文件也比较简单,如下:
# base image
FROM java:8

# maintainer
MAINTAINER bingwenwuhen bingwenwuhen@163.com

# update packages and install maven

RUN \

 export DEBIAN_FRONTEND=noninteractive && \

 sed -i 's/# \(.*multiverse$\)/\1/g' /etc/apt/sources.list && \

 apt-get update && \

 apt-get -y upgrade && \

 apt-get install -y vim wget curl maven

# attach volumes
VOLUME /vol/development


# create working directory
RUN mkdir -p /vol/development
RUN mkdir -p /vol/development/src
WORKDIR /vol/development

COPY ./src /vol/development/src/
COPY ./pom.xml /vol/development/

# maven exec
CMD ["mvn", "clean", "install", "spring-boot:run"]
dockerfile中以java8为基础镜像,同时在基础镜像中还需要单独安装maven,因为在我们的dockerfile文件中,是将整个源码都打进镜像之中,在这里没有只将生成的jar打进镜像中,所以这就是之前所说的需要在pom.xml中指定仓库,如果不指定仓库,则在镜像中拉取依赖的时候,会从中央仓库拉取依赖,那么会非常慢,我之前试过几次,基本拉取过程中,都超时失败了,所以在这里指定仓库拉取依赖。
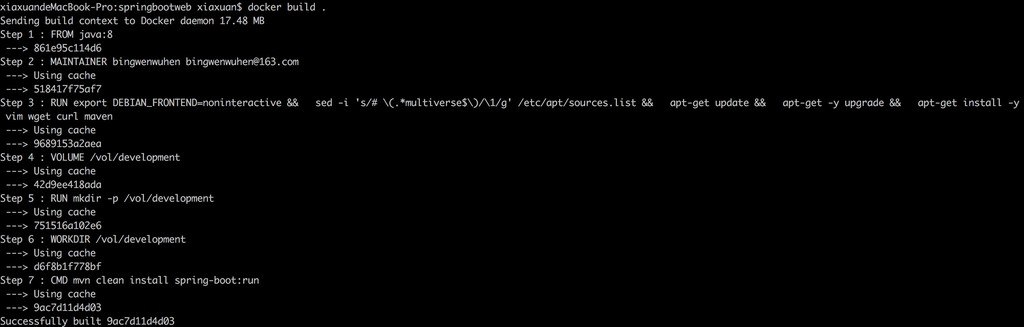
构建镜像
现在在目录下面执行命令,docker build -t="bingwenwuhen/springboot01" .构建镜像,如下:
在打成镜像之后,运行
docker run -d --name springboot01 -p 8080:8080 bingwenwuhe/spingboot01
以上命令为运行该镜像生成一个容器,映射端口为8080,名字为springboot01,
现在docker logs xxxxx查看容器日志:
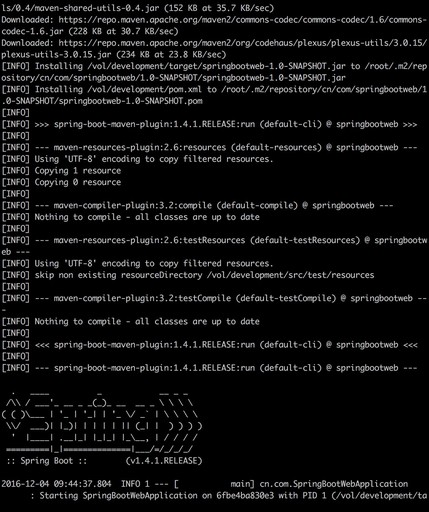
现在这个容器已经运行起来了。
请求接口
在请求接口前,需要先查看docker虚拟机的ip为多少,本机为192.168.99.100,请求接口命令为:
curl http://192.168.99.100:8080/index
响应为:
请求成功,以上,springboot应用打进docker中运行也就成功了。
问题
- 在将源码打进镜像中,mvn clean install 编译运行的时候,下载的jar包实在太多,等的时间太长,很容易中断,所以十分不推荐这种方式的运行。
- 源码本质上不应该打进镜像之中,只需要将运行的jar包打进镜像之中就可以了。
源码
我将源码上传到github上,有需要的可以自己下载。
源码下载
以上就是本文的全部内容,希望对大家的学习有所帮助,也希望大家多多支持脚本之家。


 咨 询 客 服